Deploy WordPress on AWS Lightsail: 2025 Ultimate Step-by-Step Guide to Fast, Secure WordPress Hosting
Deploy WordPress on AWS Lightsail with this comprehensive step-by-step tutorial – the easiest way to master cloud hosting and build a fast, secure WordPress website on Amazon’s reliable cloud infrastructure. Deploy WordPress on AWS Lightsail with this comprehensive step-by-step tutorial – the easiest way to master cloud hosting and build a fast, secure WordPress website on Amazon’s reliable cloud infrastructure. Amazon Lightsail is AWS’s streamlined, wallet-friendly solution for deploying WordPress on AWS Lightsail and hosting web applications. If shared hosting frustrates you with resource limitations or EC2 intimidates you with complexity, deploying WordPress on AWS Lightsail hits the perfect balance between simplicity and control. Lightsail ships with pre-configured WordPress instances, automatic backups, and transparent pricing you won’t regret. Whether you’re launching a professional blog, running a small business website, or building a client portfolio, AWS Lightsail WordPress hosting delivers enterprise-grade performance without enterprise-grade headaches. By the end of this guide, you’ll know exactly how to deploy WordPress on AWS Lightsail, secure it with SSL, and optimize your instance for traffic and scalability. WordPress on Lightsail removes the infrastructure headaches shared hosting and EC2 both throw at you. There’s no hunting through security groups, no wrestling with VPC configurations. Lightsail abstracts the technical noise while keeping you in control. You get a genuine cloud server with root access, dedicated resources, and WordPress pre-installed. That’s not shared hosting. That’s not overkill. That’s just right. for more info Starting at $5/month, Lightsail WordPress instances won’t surprise you with unexpected charges. Monthly billing is fixed and predictable. Your $5 instance stays $5 – no hidden fees, no “traffic overages,” no mysterious platform charges. Compare that to shared hosting upsells and EC2’s complexity-driven bill shock…EC2 Pricing Guide Unlike shared hosting, you’re not sandboxed with thousands of other sites competing for resources. Your WordPress site gets dedicated compute, memory, and storage. Traffic spikes on another user’s account won’t slow your pages down. Start small. If your site explodes in traffic (the good kind of problem), upgrade your instance with one click. Your WordPress stays online. Your data stays intact. No migration nightmares. Shared hosting is cheap upfront but throttles you quickly. Your site slows down. Features are locked behind premium tiers. Deploying WordPress on AWS Lightsail costs only slightly more but gives you unlimited plugins, full customization, and real performance. EC2 is powerful but demands DevOps knowledge you may not have. Security groups, subnets, AMI selection, SSH key pair management – it’s a lot. Lightsail handles all that behind the scenes. You get cloud power without the cloud learning curve. Before you deploy WordPress on Amazon Lightsail, grab these essentials: Head to your AWS Management Console. Search for “Lightsail” in the services bar. Click it. If this is your first Lightsail instance, AWS might highlight free tier eligibility. Great—note it, but don’t get distracted. Click the blue “Create instance” button to start your WordPress deployment. Lightsail offers several application blueprints. Look for WordPress in the applications section (not “WordPress Multisite” unless you need multiple sites from one instance – most users don’t). Click WordPress. The platform automatically includes Apache, MySQL, PHP, and the latest WordPress version. No manual installation needed. Lightsail offers tiered pricing. Here’s the breakdown: Start with the $5 tier unless you expect heavy traffic. You’ll upgrade later if needed—scaling on Lightsail is painless. You’ll see a few options: Review everything. It should look right. Click “Create Instance” to spin up your Lightsail WordPress instance. AWS is now launching your WordPress server. This takes 2–3 minutes. Grab coffee. Seriously. Once the instance shows a green “Running” status, click it to view details. You’ll see a public IP address assigned to your instance. Write this down or keep the tab open – you’ll need it soon. Time to connect to your server. Open your terminal (Mac/Linux) or PowerShell/Git Bash (Windows). Navigate to where you saved your SSH key pair. Then run: Replace You’re now logged into your Lightsail server. The initial WordPress setup has already happened – Bitnami (the platform handling your instance) took care of it. Bitnami stores your initial WordPress admin password on the server. Retrieve it: This displays your WordPress username and password. Copy both. You’ll use them to log in next. Open your browser and navigate to: Again, replace Congratulations—you’re now inside WordPress running on Amazon Lightsail. It works. You’re online. Here’s something important: AWS might reassign your public IP if you restart your instance. That breaks your WordPress. Prevent this by assigning a static IP. Back in your Lightsail console, click your instance. Under the “Network” tab, click “Attach static IP.” AWS assigns one. This IP never changes, even if you restart. Update your browser bookmark to use this static IP instead of the temporary one. You bought a domain elsewhere? Time to connect it. Log into your domain registrar (GoDaddy, Namecheap, Route 53, wherever). Find the DNS settings. You need to add an A Record pointing to your Lightsail static IP. Save it. DNS propagation takes 15 minutes to 48 hours. Your domain will eventually resolve to your Lightsail instance. You can check propagation at whatsmydns.net. You want HTTPS. It’s non-negotiable for WordPress. Bitnami includes Let’s Encrypt pre-configured on your Lightsail WordPress instance. You just need to enable it. Back in your terminal: Follow the prompts. Enter your domain name when asked. Let’s Encrypt validates your domain, issues a certificate, and automatically configures it with Apache. Your WordPress is now secured with HTTPS. Your visitors see the green lock icon. Your site is live. Now let’s make it fast. Install WP Super Cache or W3 Total Cache from the WordPress plugin directory. Caching reduces server load dramatically. Your pages serve faster. Your Lightsail instance handles more traffic without upgrading. WordPress doesn’t optimize images by default. Install Imagify or Smush. These plugins automatically compress images without visible quality loss. Smaller images = faster page loads = better SEO rankings. Lightsail CDN integration isn’t automatic, but you can add Cloudflare for free. Cloudflare caches your static assets globally. Visitors in Tokyo get your images from a CDN server in Japan, not your Lightsail instance in Virginia. Inside Lightsail console, check the Metrics tab. Watch CPU usage and network traffic. If you’re consistently above 80% CPU, it’s time to upgrade your instance plan. Better to scale proactively than respond to downtime. Double-check your password from Step 7. Bitnami passwords contain special characters – copy carefully. If you’re still locked out, reset it via SSH: This shows your WordPress users. Reset the password: DNS propagation takes time. Check status at whatsmydns.net. If it shows your static IP globally, but your domain still doesn’t resolve, clear your browser cache or use incognito mode. Your ISP might cache outdated DNS records. This happens if Let’s Encrypt didn’t fully configure. Re-run the certificate tool: Choose “Renew” if it’s already installed. Force Apache to reload: Lightsail handles the infrastructure. You own your WordPress security. Monthly, check WordPress core, plugins, and themes for updates. Enable automatic updates in settings. Outdated WordPress is a target for hackers. In Lightsail console, go to your instance and enable snapshots. AWS can automatically backup your entire instance daily. If something breaks, restore from backup in minutes. Change your Bitnami default username if possible. Disable password authentication – use only SSH keys. Edit /etc/ssh/sshd_config: Set In your Lightsail console, add firewall rules limiting SSH access to your IP only. Block unnecessary ports. Keep only 22 (SSH), 80 (HTTP), and 443 (HTTPS) open. Add Wordfence or Sucuri to WordPress. These plugins actively monitor for malware and brute-force attacks. They’re lifesavers. 💡 Pro Tip: Enable automatic WordPress updates and Lightsail snapshots weekly. Combine these with a security plugin, and your site will be fortress-like with minimal ongoing effort. Absolutely. Lightsail is ideal for small to medium WordPress sites because it balances simplicity, power, and cost. You get dedicated resources like EC2 but with WordPress pre-configured and priced affordably. Shared hosting can’t compete on performance. EC2 can’t compete on ease. Lightsail wins the middle ground. Lightsail WordPress hosting starts at $5/month. That includes your instance, pre-installed WordPress, MySQL database, and email support. A $5 Lightsail instance outperforms most $15/month shared hosting plans. As your site grows, upgrade to $10 or $20/month – no vendor lock-in or surprise fees. Yes, completely. Your WordPress is standard-nothing proprietary. You can export your content, migrate your database, and move to EC2, another hosting provider, or anywhere else. If you’ve followed this guide, you now know exactly how to deploy WordPress on AWS Lightsail – from selecting the right instance plan to optimizing and securing your site. Lightsail makes cloud hosting accessible to everyone by combining AWS reliability with simplicity, predictable pricing, and scalable performance. By choosing to deploy WordPress on AWS Lightsail, you gain complete control over your hosting environment while enjoying automated backups, dedicated resources, and one-click scalability. Whether you’re a small business owner, developer, or blogger, Lightsail gives you the freedom to grow without the complexity of traditional infrastructure. In short, deploying WordPress on AWS Lightsail gives you all the benefits of cloud hosting-speed, security, and simplicity-without the steep learning curve. Once your site is live, you can go further by exploring these resource:Table of Contents
Introduction
Why Deploy WordPress on AWS Lightsail?
The Sweet Spot: Simplicity Without Sacrifice
Pricing That Makes Sense
You Own Your Infrastructure
Scale When You’re Ready
Lightsail vs. Shared Hosting
Lightsail vs. EC2
Prerequisites
Step-by-Step Guide to Deploy WordPress on AWS Lightsail
Step 1: Log In and Navigate to Lightsail
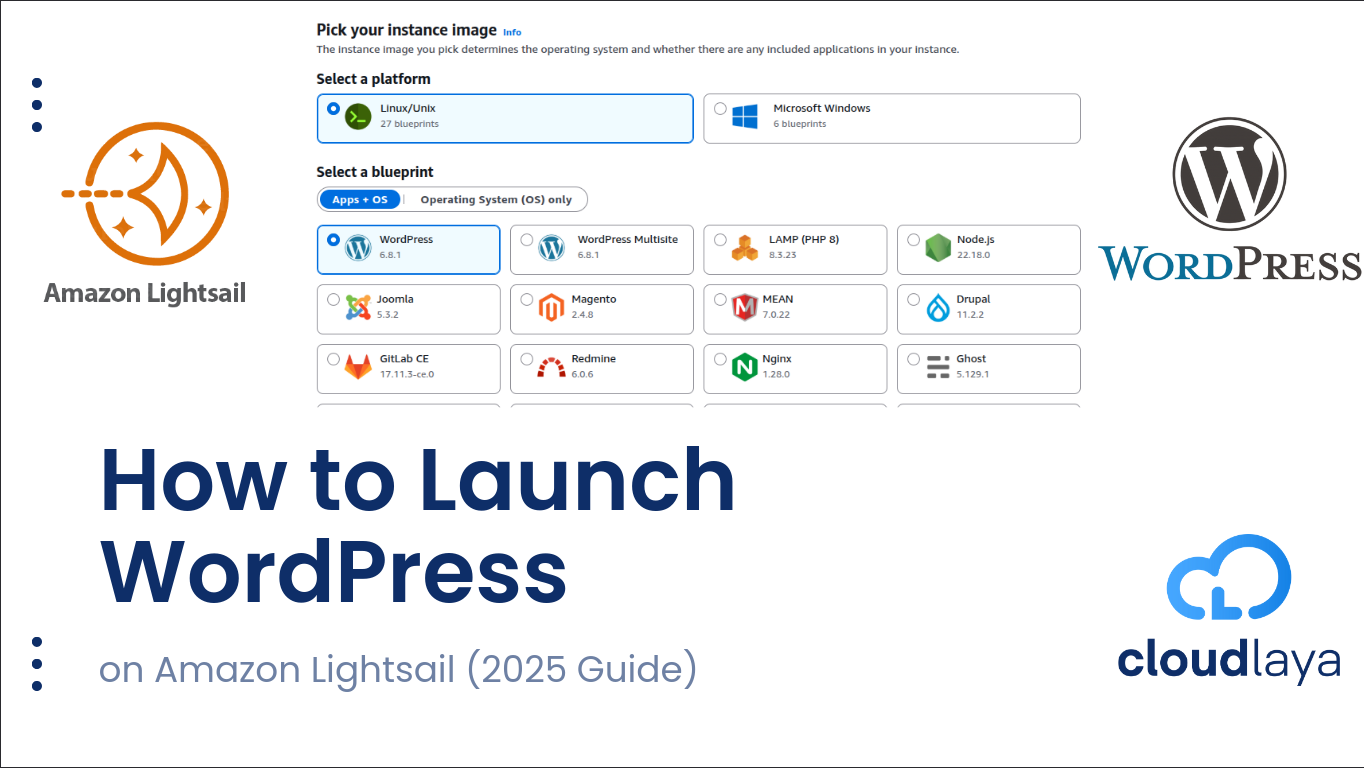
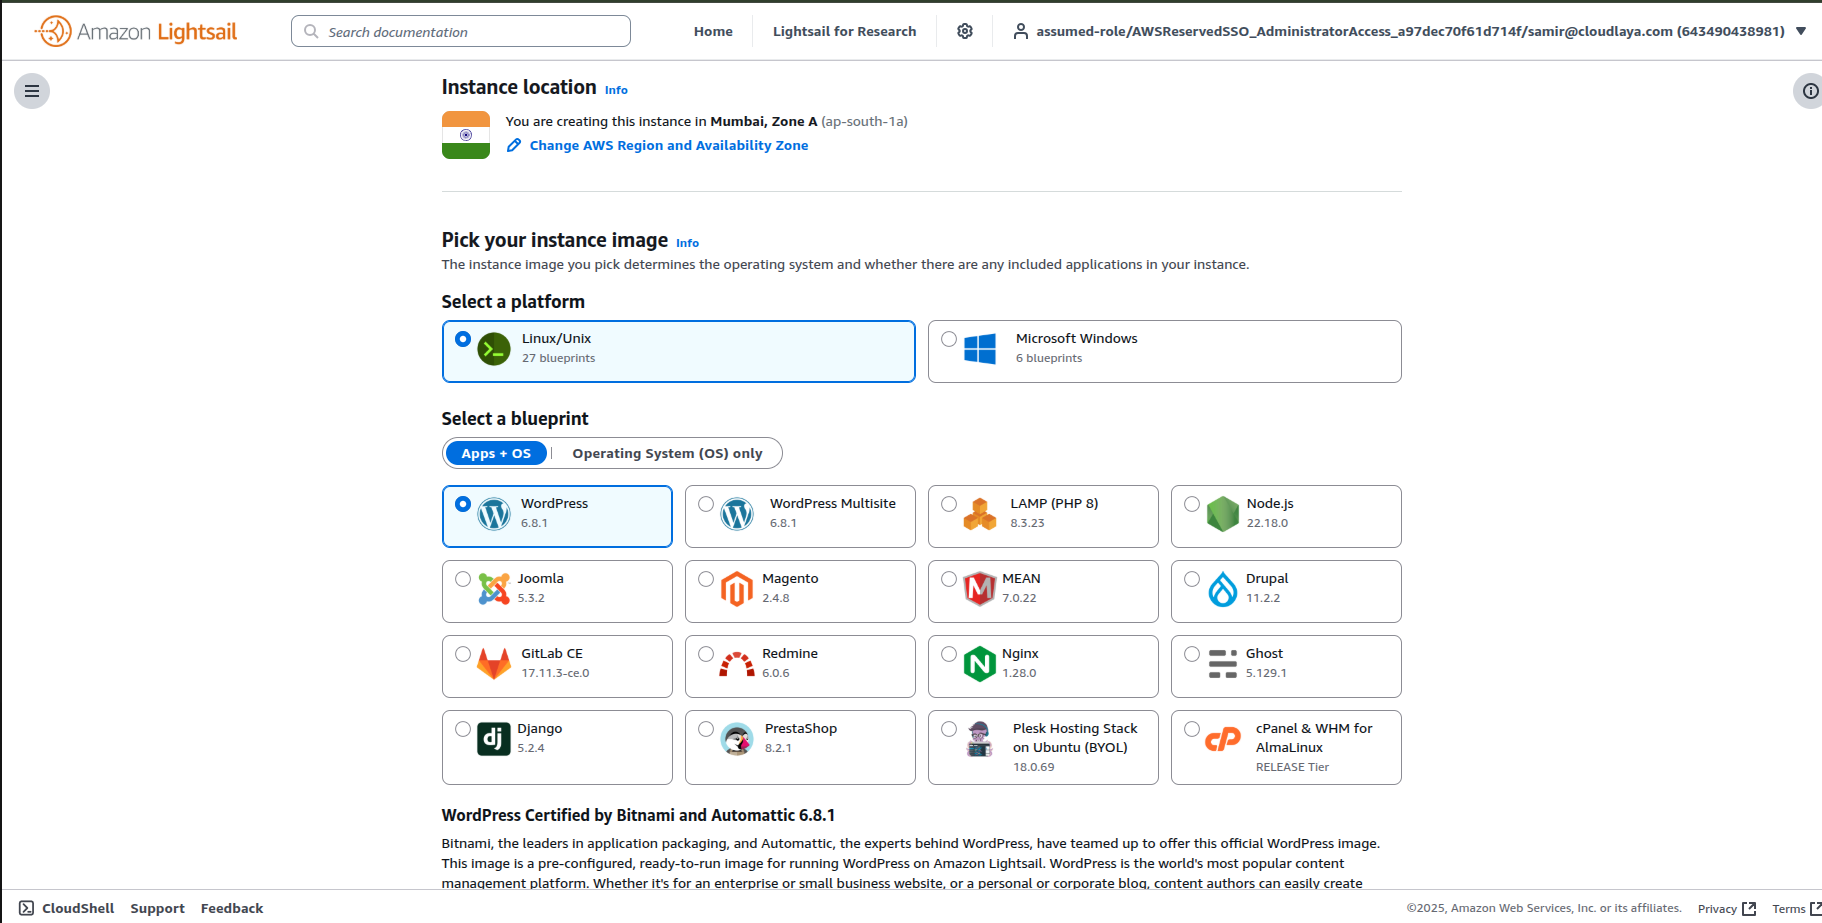
Step 2: Select the WordPress Blueprint
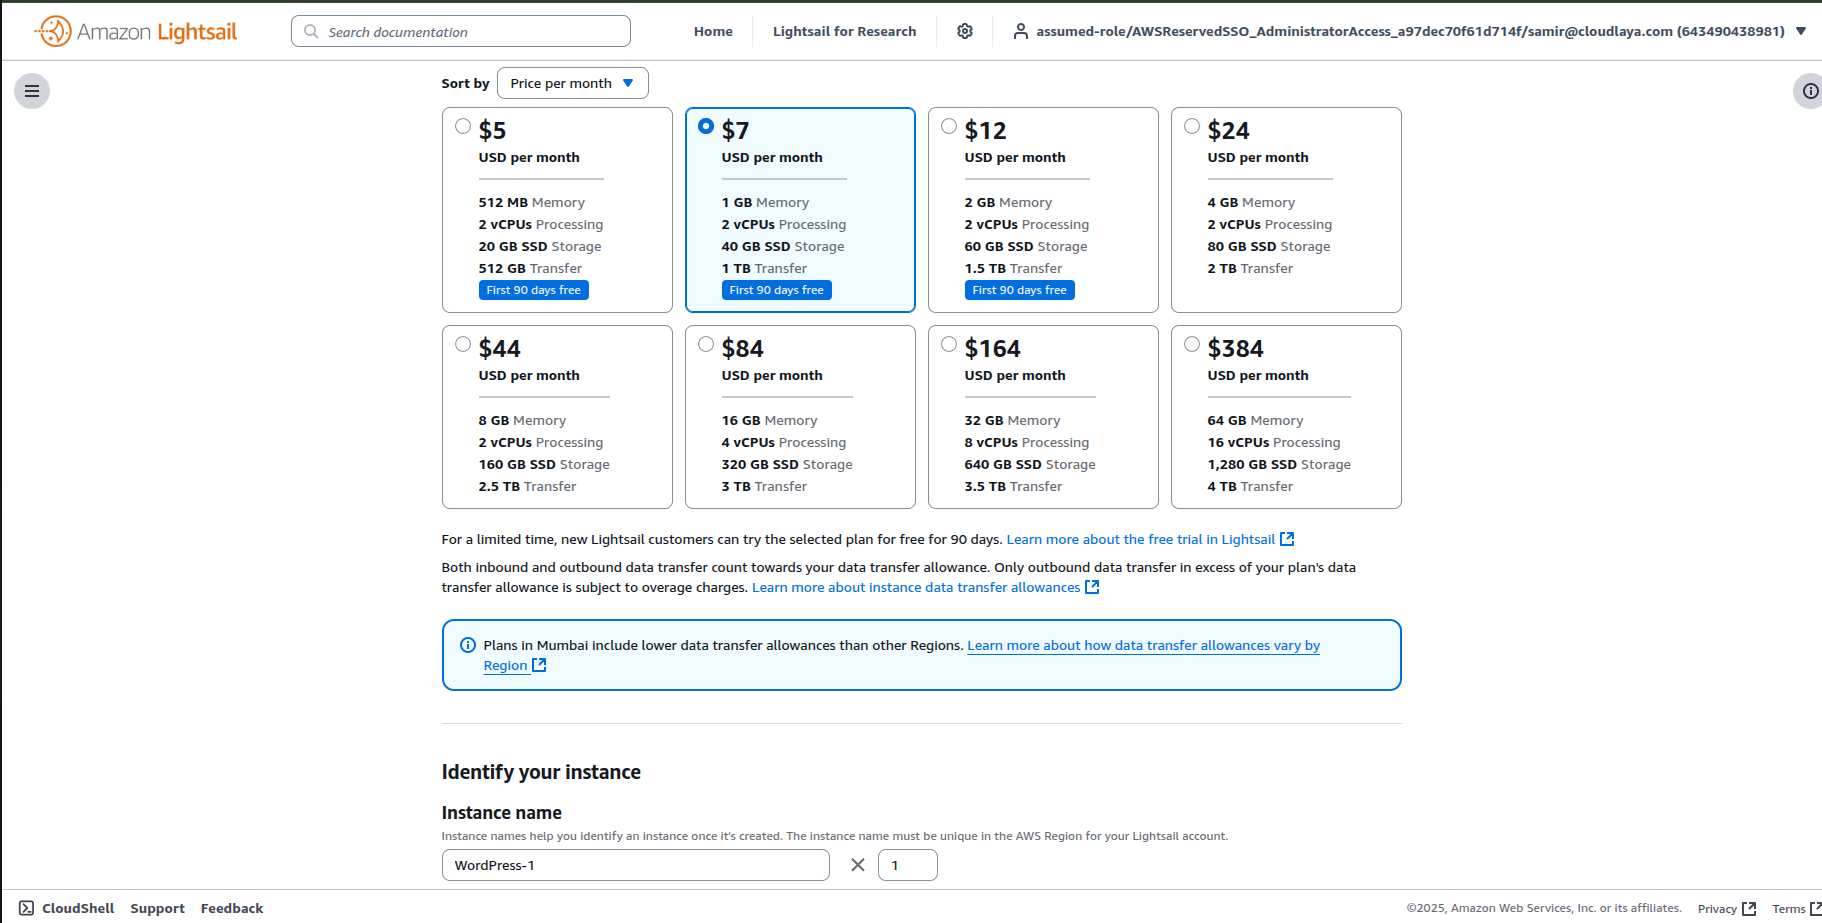
Step 3: Choose Your Instance Plan
Step 4: Configure Your Instance Settings
Step 5: Wait for Deployment (Then Grab Your IP)
Step 6: Connect via SSH (Access Your Server)
ssh -i /path/to/your/key.pem bitnami@YOUR_PUBLIC_IPYOUR_PUBLIC_IP with the actual IP from Step 5. The first time you connect, your terminal asks if you trust the connection. Type yes and press Enter.Step 7: Retrieve Your WordPress Login Credentials
cat /home/bitnami/bitnami_credentialsStep 8: Access Your WordPress Dashboard
http://YOUR_PUBLIC_IP/wp-adminYOUR_PUBLIC_IP with your actual IP. You’ll see the WordPress login screen. Enter the credentials from Step 7.Step 9: Assign a Static IP (Essential Before Domain)
Step 10: Point Your Domain to Lightsail
Step 11: Install SSL Certificate (Let’s Encrypt)
sudo /opt/bitnami/bncert-toolOptimize Performance After You Deploy WordPress on AWS Lightsail
Enable Caching
Compress Images
Use a CDN
Monitor Performance
Common Issues When You Deploy WordPress on AWS Lightsail
I Can’t Log Into WordPress
sudo /opt/bitnami/wordpress/wp-cli.phar user listsudo /opt/bitnami/wordpress/wp-cli.phar user update 1 --prompt=user_passMy Domain Isn’t Working
HTTPS Shows a Warning
sudo /opt/bitnami/bncert-toolsudo /opt/bitnami/apache2/ctl restartSecurity & Maintenance
Keep WordPress Updated
Enable Automatic Backups
Harden SSH Access
sudo nano /etc/ssh/sshd_configPasswordAuthentication no. Restart SSH:sudo /opt/bitnami/ctlscript.sh restart sshUse Lightsail Firewall Rules
Install Security Plugins
Frequently Asked Questions About Lightsail WordPress
Is Amazon Lightsail Good for WordPress Hosting?
How Much Does It Cost to Host WordPress on Lightsail?
Can I Migrate My WordPress Site Away From Lightsail Later?
Conclusion