AWS Lightsail Made Easy: Hosting Made Simple at Just $3.50/Month
AWS Lightsail is Amazon’s simplified cloud platform designed to make web hosting and application deployment accessible to developers and small businesses without the complexity of traditional AWS services. Think of it as a streamlined version of AWS that provides virtual private servers (VPS) with predictable pricing, easy management, and built-in networking features. Unlike EC2, which can overwhelm beginners with hundreds of configuration options, Lightsail offers pre-configured bundles that include compute, memory, SSD storage, and data transfer allowances at fixed monthly rates starting from just $3.50. This makes it perfect for hosting websites, web applications, development environments, and small-scale projects without worrying about unexpected costs or complex setup procedures. Whether you’re a developer looking to quickly deploy a prototype, a small business owner wanting to host your company website, or someone transitioning from shared hosting to cloud infrastructure, Lightsail provides the perfect balance of simplicity and power. It includes everything you need: one-click application installs (WordPress, LAMP, Node.js), automatic backups, monitoring dashboards, and easy scaling options. Before diving into Lightsail, you’ll need a few things in place to ensure a smooth experience. First, you’ll need an active AWS account. If you don’t have one:Prerequisites and Setup for AWS Lightsail Tutorial
AWS Account Requirements
AWS requires a valid credit card for account creation, even for free tier services. You won’t be charged unless you exceed free tier limits or use paid services.
Basic Technical Knowledge
While Lightsail is beginner-friendly, having these foundational skills will help:
- Command line basics: Understanding how to navigate directories and run commands
- SSH concepts: Knowing what SSH is and why it’s used for server access
- Web fundamentals: Basic understanding of how web servers, domains, and DNS work
- File management: Comfort with uploading, downloading, and editing files
Understanding Lightsail Pricing
Lightsail uses simple, predictable pricing with bundles that include:
| Plan | vCPU | Memory | Storage | Transfer | Price/Month |
|---|---|---|---|---|---|
| $3.50 | 1 | 512 MB | 20 GB SSD | 1 TB | $3.50 |
| $5 | 1 | 1 GB | 40 GB SSD | 2 TB | $5.00 |
| $10 | 1 | 2 GB | 60 GB SSD | 3 TB | $10.00 |
| $20 | 2 | 4 GB | 80 GB SSD | 4 TB | $20.00 |
| $40 | 2 | 8 GB | 160 GB SSD | 5 TB | $40.00 |
Creating Your AWS Lightsail Instance
Now let’s walk through creating your first Lightsail instance step by step.
Step 1: Access the Lightsail Console
- Log into your AWS account at console.aws.amazon.com
- In the services search bar, type “Lightsail” and select it
- You’ll see the Lightsail homepage with a “Create instance” button
Step 2: Choose Instance Location
Select the AWS region closest to your target audience:
- US East (N. Virginia) – Default, good for US-based audiences
- US West (Oregon) – Better for West Coast users
- Europe (Ireland) – Ideal for European users
- Asia Pacific (Singapore) – Best for Asian markets
Why location matters: Closer servers mean faster loading times for your users. Choose based on where most of your traffic will come from.
Step 3: Select a Blueprint
Lightsail offers several blueprint categories:
Operating Systems Only
- Amazon Linux 2: Lightweight, optimized for AWS
- Ubuntu: Popular, beginner-friendly Linux distribution
- CentOS: Enterprise-focused Linux distribution
- Windows Server: For .NET applications and Windows-specific needs
Applications + OS
- WordPress: Pre-configured blog/website platform
- LAMP Stack: Linux + Apache + MySQL + PHP
- Node.js: JavaScript runtime for web applications
- Django: Python web framework
- Ghost: Modern publishing platform
Step 4: Choose Your Instance Plan
Select a bundle based on your needs:
- $3.50/month: Perfect for static websites or light development
- $5/month: Good for small web applications with moderate traffic
- $10/month: Suitable for growing applications or development environments
- $20+/month: For production applications with higher resource requirements
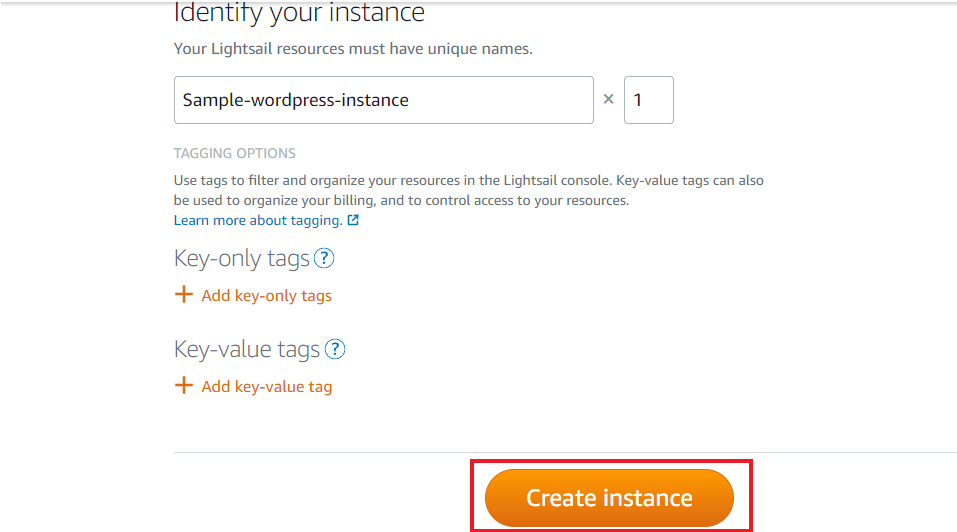
Step 5: Name Your Instance and Add Tags
- Instance name: Choose something descriptive like “my-web-app” or “company-website”
- Tags (optional): Add key-value pairs for organization (e.g., Project: Portfolio, Environment: Development)
Step 6: Launch Your Instance
- Review your selections
- Click “Create instance”
- Wait 2-3 minutes for your instance to start
- You’ll see a green “Running” status when it’s ready
Connecting to Your Lightsail Instance
Once your instance is running, you need to connect to it to start deploying your applications.
Method 1: Browser-Based SSH (Easiest)
Lightsail provides a convenient browser-based SSH client:
- Click on your instance name in the Lightsail console
- Click the “Connect using SSH” button
- A new browser tab opens with a terminal interface
- You’re automatically logged in as the default user
Method 2: Traditional SSH Client
For more advanced users or when you need persistent connections:
Download Your SSH Key
- In the Lightsail console, go to “Account” → “SSH keys”
- Download your default key pair (it’s a .pem file)
- Save it to a secure location on your computer
Connect via Terminal (macOS/Linux)
# Make the key file secure (required by SSH) chmod 400 ~/Downloads/LightsailDefaultKey-us-east-1.pem # Connect to your instance ssh -i ~/Downloads/LightsailDefaultKey-us-east-1.pem ubuntu@YOUR_INSTANCE_IPReplace YOUR_INSTANCE_IP with your instance’s public IP address (found in the Lightsail console).
Basic Server Commands
Once connected, here are essential commands to get started:
# Check system information uname -a whoami pwd # Update the system (Ubuntu/Debian) sudo apt update sudo apt upgrade -y # Check available disk space df -h # Check memory usage free -h # View running processes topDeploying Your First Web Application
Let’s deploy a simple web application to demonstrate the complete process.
Setting Up the Web Server Environment
If you chose the LAMP blueprint, Apache is already installed. For Ubuntu-only instances, let’s install it:
# Update package list sudo apt update # Install Apache web server sudo apt install apache2 -y # Start and enable Apache sudo systemctl start apache2 sudo systemctl enable apache2 # Check Apache status sudo systemctl status apache2Testing Your Web Server
- Open a web browser
- Navigate to your instance’s public IP address
- You should see the Apache default page
Creating a Simple Web Application
Let’s create a basic PHP application:
# Navigate to the web root directory cd /var/www/html # Create a simple PHP info page sudo nano info.phpAdd this content to the file:
<?php // Simple PHP application echo "<h1>Welcome to My Lightsail App!</h1>"; echo "<p>Server Time: " . date('Y-m-d H:i:s') . "</p>"; echo "<p>Server IP: " . $_SERVER['SERVER_ADDR'] . "</p>"; // Display PHP information phpinfo(); ?>Save the file (Ctrl+X, then Y, then Enter in nano).
Testing Your Application
Visit http://YOUR_INSTANCE_IP/info.php in your browser. You should see your custom page with server information.
Networking Configuration
Proper networking setup is crucial for making your application accessible and secure.
Setting Up a Static IP Address
By default, Lightsail instances get dynamic IP addresses that can change when you restart. For production applications, you need a static IP:
- In the Lightsail console, go to “Networking”
- Click “Create static IP”
- Choose your instance from the dropdown
- Give it a descriptive name
- Click “Create”
Configuring DNS and Domain Names
Using Lightsail DNS Zone
- Go to “Networking” → “DNS zones” in Lightsail console
- Click “Create DNS zone”
- Enter your domain name (e.g., mywebsite.com)
- Create A records pointing to your static IP:
| Record Type | Subdomain | Resolves To |
|---|---|---|
| A | @ (root domain) | Your Static IP |
| A | www | Your Static IP |
| CNAME | blog | www.mywebsite.com |
Firewall Configuration
Lightsail includes a built-in firewall for security. Configure it properly:
Default Rules
- SSH (port 22): Enabled by default
- HTTP (port 80): Add for web applications
- HTTPS (port 443): Add for SSL-enabled sites
Adding Firewall Rules
- Go to your instance’s “Networking” tab
- Click “Add rule” in the Firewall section
- Configure based on your needs:
Common Web Application Rules:
HTTP - Protocol: TCP, Port: 80, Source: Anywhere HTTPS - Protocol: TCP, Port: 443, Source: Anywhere SSH - Protocol: TCP, Port: 22, Source: Restricted (your IP) MySQL - Protocol: TCP, Port: 3306, Source: Custom (app servers only)Monitoring and Scaling Your Lightsail Instance
Effective monitoring helps you understand your application’s performance and plan for scaling needs.
Understanding Lightsail Metrics
Lightsail provides built-in monitoring for key metrics:
CPU Utilization
- Normal: 10-30% for most web applications
- High: Sustained 80%+ indicates need for more resources
- Spikes: Brief high usage during traffic bursts is normal
Network Traffic
- In/Out: Shows data transfer usage against your bundle limit
- Patterns: Identify peak usage times and traffic trends
Setting Up Monitoring Alerts
- Go to your instance’s “Metrics” tab
- Click “Create alarm” for any metric
- Configure thresholds:
Recommended Alert Thresholds:
CPU Utilization: > 80% for 5 minutes Disk Usage: > 85% of total space Network Out: > 80% of monthly allowanceScaling Strategies
Vertical Scaling (Upgrading Instance)
When you need more resources:
- Create a snapshot of your current instance
- Go to your instance and click “Manage”
- Click “Upgrade” and select a larger bundle
- Your instance will restart with new resources
Using Claude AI for Development Assistance
Claude can significantly accelerate your Lightsail setup and development workflow. Here’s how to leverage AI assistance effectively.
Command Generation and Automation
System Administration Commands
Ask Claude to generate commands for common tasks:
Example Prompt:
“Generate commands to install and configure Nginx on Ubuntu 20.04, including SSL certificate setup with Let’s Encrypt”
Claude Response:
# Update package list sudo apt update
Install Nginx

sudo apt install nginx -y
Start and enable Nginx

sudo systemctl start nginx
sudo systemctl enable nginx
Install Certbot for Let's Encrypt

sudo apt install certbot python3-certbot-nginx -y
Configure firewall

sudo ufw allow 'Nginx Full'
sudo ufw allow ssh
Obtain SSL certificate (replace example.com with your domain)

sudo certbot --nginx -d example.com -d www.example.com
Test automatic renewal

sudo certbot renew --dry-run
Troubleshooting with AI
When you encounter issues, Claude can help diagnose and resolve them quickly.
Error Analysis
Example Scenario: Your web application returns a 500 error.
Prompt:
“My PHP application on Apache returns a 500 error. Here’s the Apache error log: [paste error log]. Help me troubleshoot this.”
Claude can analyze error logs and provide specific solutions based on the error messages.
Deployment Automation Scripts
Ask Claude to create deployment scripts for your specific tech stack:
Example Prompt:
“Create a deployment script for a Node.js application that pulls from GitHub, installs dependencies, and restarts PM2”
Claude Response:
#!/bin/bash # Deployment script for Node.js application

set -e # Exit on any error

echo "Starting deployment..."
Variables

APP_DIR="/var/www/myapp" REPO_URL="https://github.com/username/myapp.git" BRANCH="main"
Navigate to app directory

cd $APP_DIR
Pull latest code

echo "Pulling latest code..."
git fetch origin
git reset --hard origin/$BRANCH
Install/update dependencies

echo "Installing dependencies..."
npm ci --production
Restart application with PM2

echo "Restarting application..."
pm2 restart myapp
Check application status

pm2 status

echo "Deployment completed successfully!"
Best Practices, Costs, and Next Steps
As you become more comfortable with Lightsail, following these best practices will help you build scalable, secure, and cost-effective applications.
Security Best Practices
Access Control
- Principle of Least Privilege: Only open necessary ports in the firewall
- SSH Key Management: Use strong SSH keys and rotate them regularly
- User Management: Avoid using root user; create dedicated users with sudo access
- Regular Updates: Keep your OS and applications updated with security patches
# Create a new user with sudo privileges sudo adduser deployuser sudo usermod -aG sudo deployuser # Disable root SSH access sudo nano /etc/ssh/sshd_config # Set: PermitRootLogin no # Set: PasswordAuthentication no (use keys only) sudo systemctl restart sshCost Optimization Strategies
Right-Sizing Your Instance
Start small and scale up based on actual usage:
- Development: $3.50 or $5 plans are sufficient
- Small Production: $10-20 plans handle moderate traffic
- High Traffic: Consider $40+ plans or multiple instances with load balancing
Next Steps and Advanced Topics
Immediate Next Steps (Week 1-2)
- Deploy your first application using the steps in this guide
- Set up monitoring and alerts
- Configure SSL certificates for HTTPS
- Create your first automated backup
Short-term Goals (Month 1)
- Implement a proper deployment pipeline
- Set up staging and production environments
- Configure domain name and DNS
- Optimize performance based on real traffic data
Remember, Lightsail is designed to grow with you. Start with the basics covered in this guide, then gradually explore advanced features as your applications and expertise develop. The key is to build solid foundations and iterate based on real-world usage and requirements.
FAQs
- What’s the difference between Lightsail and EC2?
- Lightsail is a simplified VPS service with fixed pricing and pre-configured bundles, while EC2 offers more flexibility with hundreds of instance types and pay-as-you-go pricing. Lightsail is perfect for beginners and simple applications, while EC2 is better for complex, enterprise-level deployments.
- Can I upgrade my Lightsail instance later?
- Yes, you can upgrade to a larger bundle at any time through the Lightsail console. The upgrade requires a brief restart (2-5 minutes), but all your data and configurations are preserved. You cannot downgrade to a smaller plan.
- How can Claude help with Lightsail management?
- Claude can generate installation commands, create deployment scripts, troubleshoot errors by analyzing log files, and provide configuration templates. It’s particularly useful for automating repetitive tasks and getting quick solutions to common server administration challenges.
- What happens if I exceed my data transfer limit?
- Lightsail provides overage protection—your application won’t go down, but you’ll be charged for additional data transfer at $0.09 per GB. Monitor your usage through the metrics dashboard and consider upgrading to a higher plan if you consistently exceed limits.
- Is Lightsail suitable for production applications?
- Yes, Lightsail is suitable for small to medium production applications. It includes automatic backups, monitoring, load balancers, and managed databases. For large-scale or enterprise applications, you may eventually need to migrate to more advanced AWS services like EC2 and RDS.
Transform Your Business With Cloud Excellence ?
Schedule a session with our experts to discuss your cloud solutions.