Deploy Django App in AWS Using Elastic Beanstalk and CodePipeline
This article shows how to deploy a full-fledged Django website to an AWS Elastic Beanstalk Python environment and then integrate it into AWS CodePipeline. This article demonstrates how to use an Elastic Beanstalk environment to host a Python web app in the cloud.
The following are the tools and technologies used:
- Python v3.8
- Django v4.0
- Amazon Elastic Beanstalk, EC2, S3, Codepipeline
- AWS EB CLI 3.x
- PostgreSQL
Table of Contents
Elastic Beanstalk Overview
Elastic Beanstalk is an Amazon AWS Platform As A Service (PaaS) that makes it easier to set up, deploy, and maintain your program. It’s a managed service that combines the server (EC2), Autoscaling, Load Balancing, and static files into one package (S3). You can easily install and manage your application, which scales up and down as your site expands.
Why is CI/CD important?
Assume you develop a Django web application on your local machine and then publish it to AWS Elastic Beanstalk. If you’ve done this before or followed this instruction, you’ll know that it’s a rather simple process. After you’ve set up AWS CLI and finished your application, execute eb init and then eb deploy to start it.
You modify the appropriate files and run eb deploy again if you need to make any changes.
However, if your program attracts users throughout the day, a new code modification might produce an issue, resulting in a 404 or 500 error for users. To address this issue, developers built up CI/CD pipelines in which each code update is tested before being automatically deployed to production. This allows developers to submit thousands of lines of code and get deployed to the website within a couple of minutes sometimes some seconds.
Deploy Django eCommerce App to AWS
Instance and SSH
Step 1: Launch an instance(ubuntu) with default configuration.
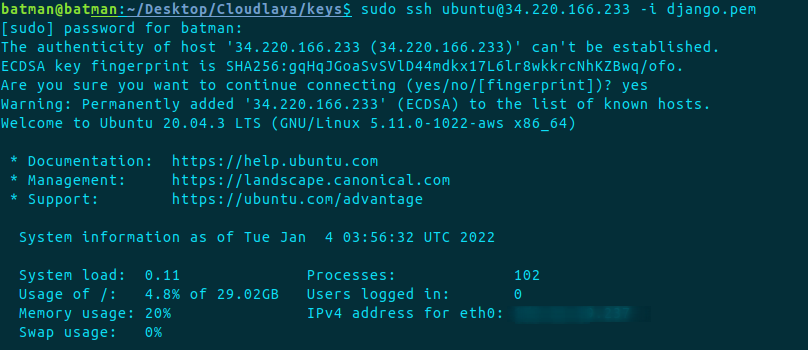
Step 2: SSH to the instance
chmod 400 test.pem
Sudo ssh ubuntu@public_ip -i test.pem
Install required packages and dependencies
We need to have an environment where we deploy our application, thus install python, pip, and awsebcli accordingly.
Install Python
sudo apt update
sudo apt install software-properties-common
sudo add-apt-repository ppa:deadsnakes/ppa
sudo apt update
sudo apt install python3.8
python3 --version
Install pip
sudo apt install python3-pip
pip3 --version
Install awsebcli with pip
export PATH=$PATH:~/.local/bin/
pip install --upgrade --user awsebcli
eb --version
Configure GitHub SSH with VPS
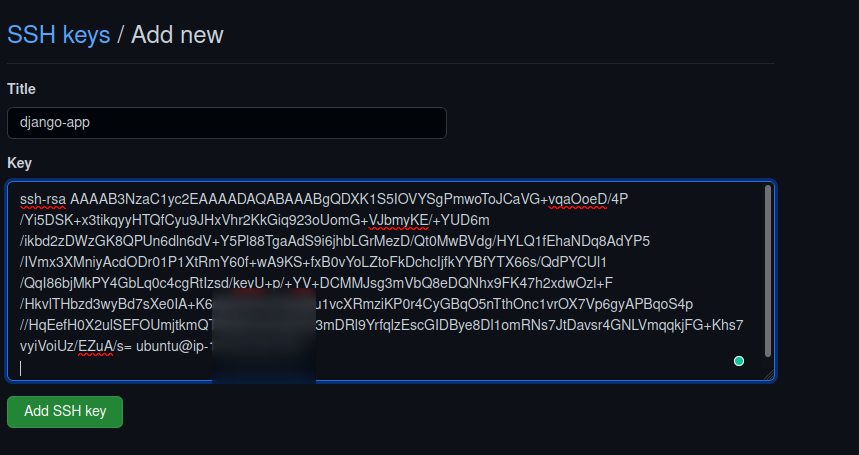
Step 1: Add id-rsa.pub of the VPS to GitHub to manage the repository.
Generate RSA
ssh-keygen -t RSA
cd .ssh/
cat id_rsa.pub
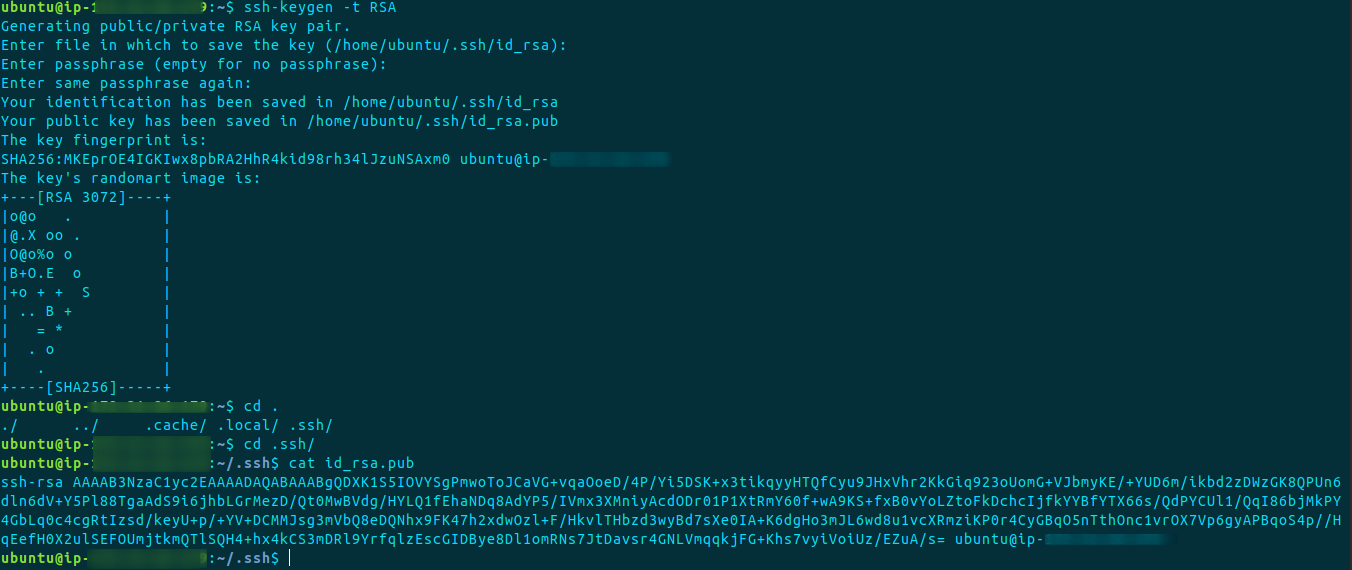
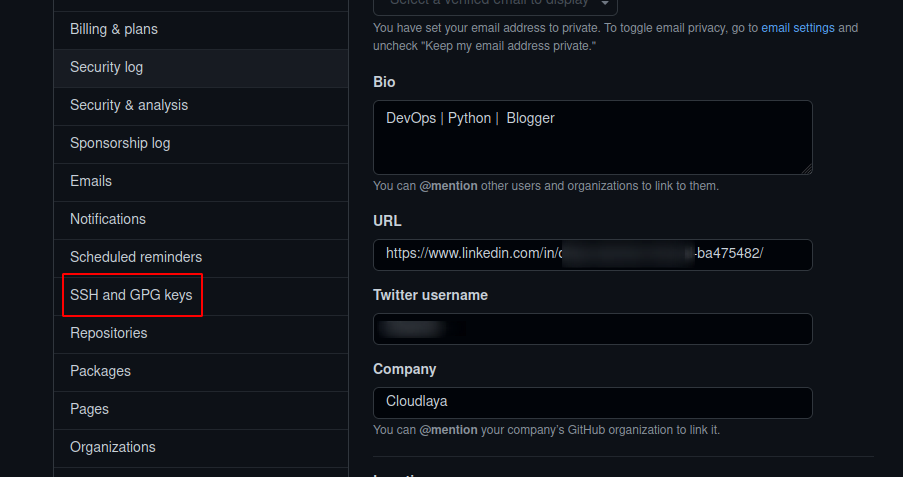
Step 2: Click on your profile and go to settings, there copy and paste the public id_rsa to the GitHub SSH and GPG keys.
Step 3: At this point, we suppose you already have a repository of your Django app in the GitHub
Now, let’s clone it to our server.
git clone [email protected]:user101/commerce.git

Setup Virtual Environment
Step 1: Now to get started you need to set up a virtual env in your project.
Create a virtual environment inside the project directory using
virtualenv env
Now activate the virtual env.
source env/bin/activate
If you already have requirements.txt that’s fine but we will need additional packages for the deployment, refer to GitHub Gist to get the required packages.
Now, download the packages using the following commands inside the virtual env.
pip install -r requirements.txt
To add available packages to the requirements.txt
pip freeze > requirements.txt
Testing Django App with Sqlite3 in Server
Since our application is running in a VPS machine, we need to verify if everything runs as perfectly as our local machine.
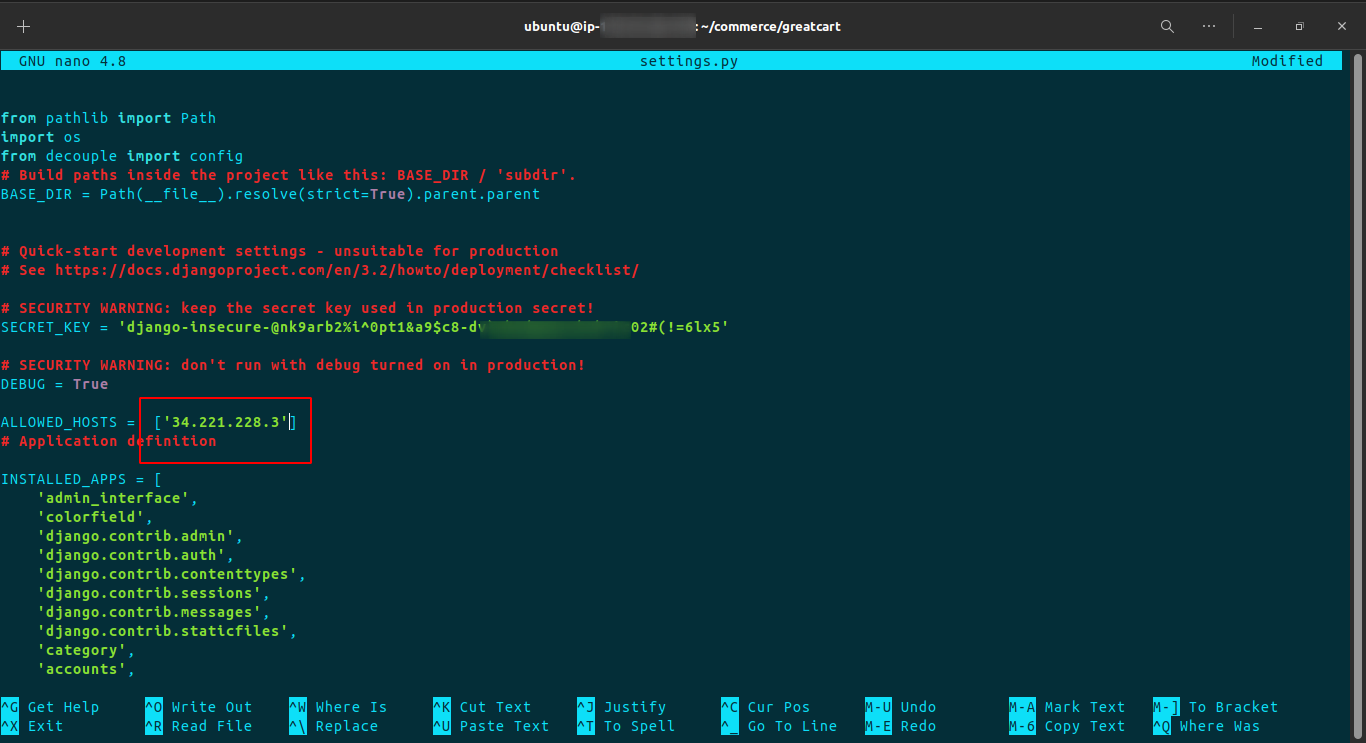
In the settings.py, add the server IP to the allowed host.
If any error occurs, remove dbsqlite3, migration files, and __pycache__ from every application.
Now migrate the application with a command:
python3 manage.py migrate -run-syncdb
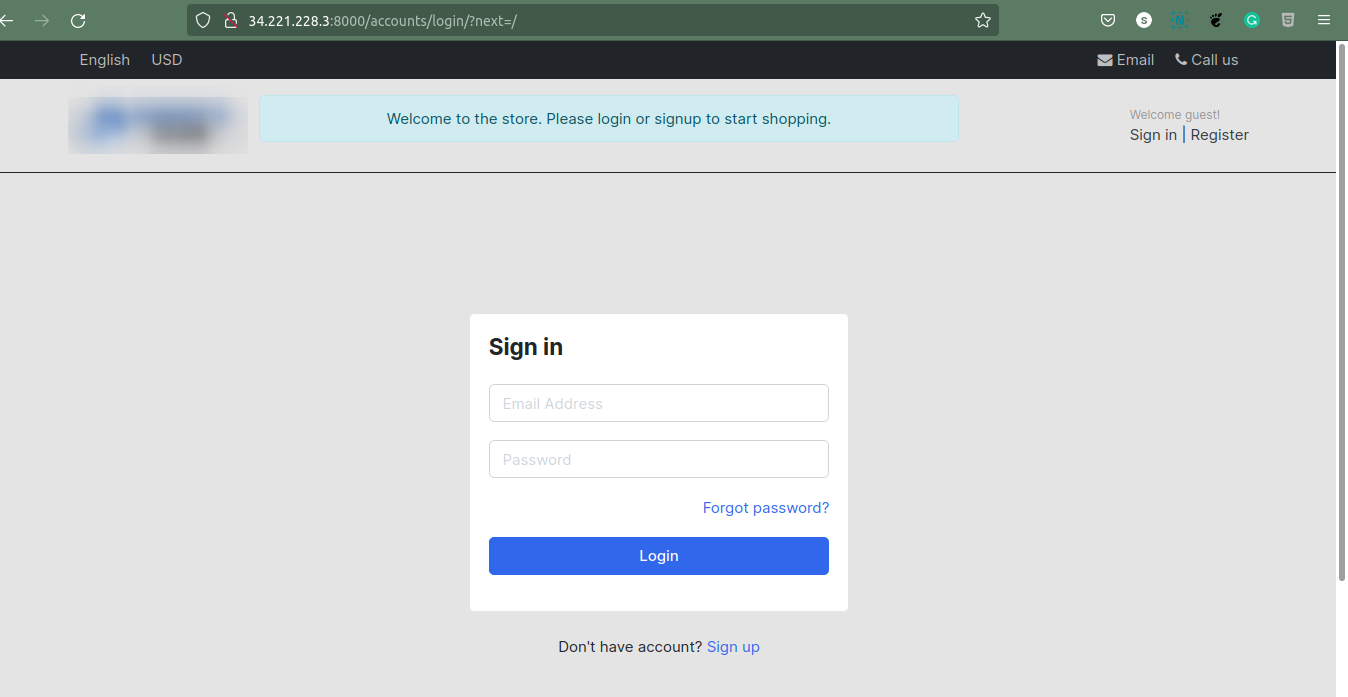
Finally, you can run the Django app using the server IP.
If the port is already in use, we need to kill the 8000/TCP process.
fuser -k 8000/tcp
pkill -9 portNumber
Run the following command, this will accept any IP address and run the app on port 8000.
python3 manage.py runserver 0.0.0.0:8000
If you run into an SMTP issue while logging or signing in, it’s probably because of the Google Captcha preventing access to the account.
To resolve this, go to https://accounts.google.com/DisplayUnlockCaptcha and confirm with the account you have set SMTP in settings.py.
Configuring Postgres
Step 1: Since we are going into the deployment environment, we would like to use the PostgreSQL database to connect to our Django app.
Installing Postgres in Server
1. Installing the Postgres in the same instance where we have our application.
sudo apt install postgresql postgresql-contrib
2. After installation, we can connect to the Postgres DB command terminal with:
sudo -i -u postgres
3. To go to Postgres command prompt
psql
4. To exit out of PostgreSQL prompt
\q
5. To exit out Postgres command terminal
exit
Creating a new user and database
1. On the Linux terminal
sudo -i -u postgres
2. Create a user
createuser --interactive --pwprompt
3. Postgres console
psql
4. List users
\du
5. Create a database
create database dbName;
6. List database
\l
7. Granting database permission to our new user.
grant all privileges on database dbName to dbUser;
8. Check database name and database user
psql dbName
\du
\dt
9. Exit out of PostgreSQL console and terminal.
\q
exit
In order to configure the database, we need a python psycopg package.
pip install psycopg2-binary
Now in the settings.py add the following and configure accordingly, you can either leave the SQLite3 configuration with IF.ELSE condition with Postgres or comment that out.
DATABASES = {
    'default': {
        'ENGINE': 'django.db.backends.postgresql_psycopg2',
        'NAME': 'Db_name',
        'USER': 'Db_user',
        'PASSWORD': 'Db_password',
        'HOST': 'Public_ip',
        'PORT': '5432',
   }
}
Adding all traffic to Postgres listen_address
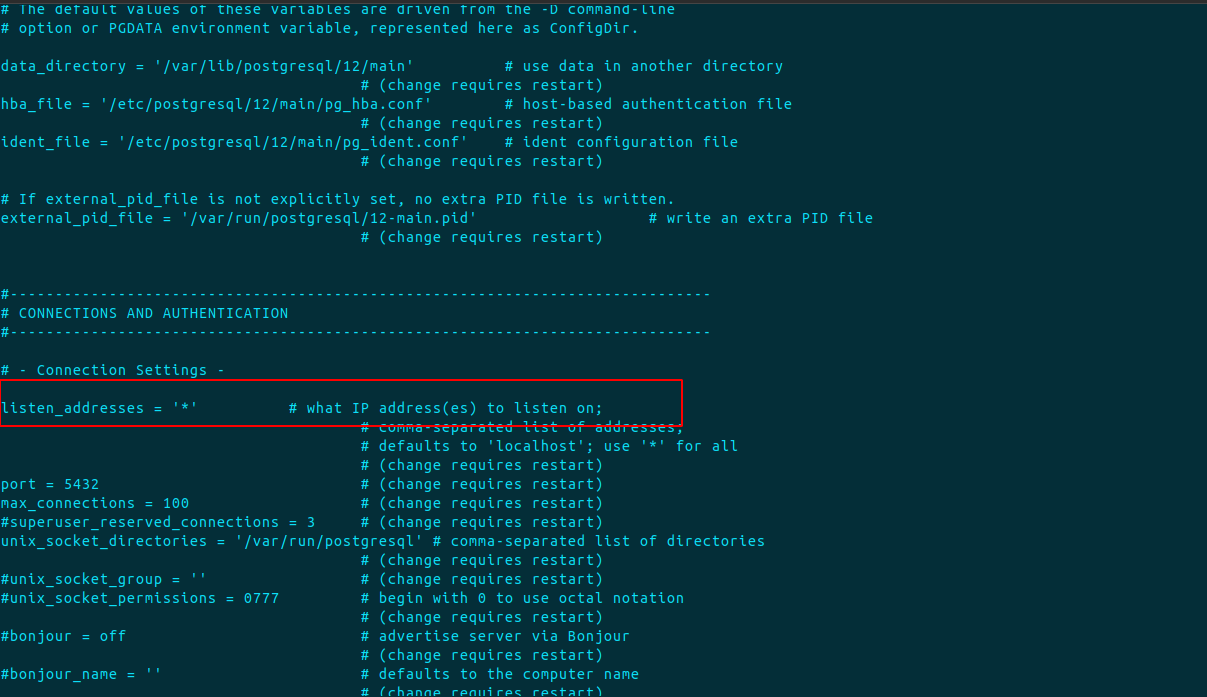
We have configured the PostgreSQL however we need to enable traffic to listen to the Postgres 5432. We need to edit the postgresql.conf file and change the line with ‘listen_addresses’. This file you can find in the /etc/postgresql/12/main directory.
Default Ubuntu config has allowed only localhost (or 127.0.0.1) interface, which is sufficient for using, when every PostgreSQL client works on the same computer, as PostgreSQL server. If you want to connect to the PostgreSQL server from other computers, you have to change this config line in this way:
listen_addresses = '*'
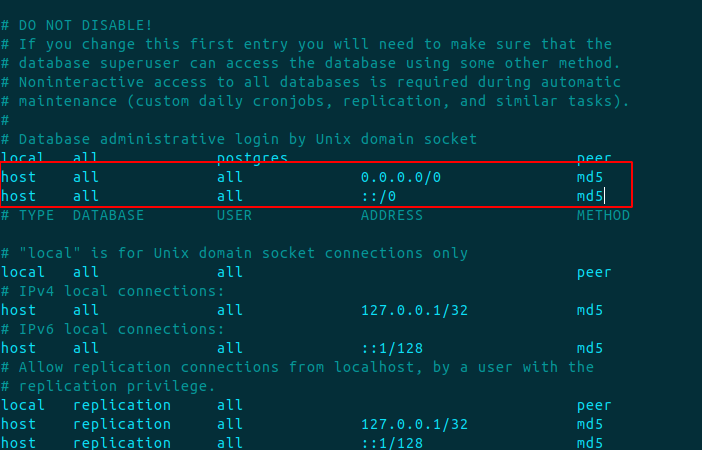
Then you have to edit the pg_hba.conf file, too. In this file you have set, from which computers you can connect to this server and what method of authentication you can use. Usually, you will need a similar line: (0.0.0.0 is accepting IPV4 and ::/0 is accepting IPV6)
host    all         all         0.0.0.0/0     md5
host    all         all         ::/0          md5
Restarting PostgreSQL server
After you configure Postgres files, restart the server to save changes.
sudo systemctl restart postgresql
Migrating the Database
Now migrate the database and runserver, this should make changes according to the PostgreSQL database.
python3 manage.py makemigrations
python3 manage.py migrate
python3 manage.py runserver 0.0.0.0:8000
Now open the IP with 8000 port in the browser, you should see the application is running as usual but this time connected with PostgreSQL.
Configuring site for elastic beanstalk
Configuring files
Step 1: Making files and configuration
1. ebextension
Make a directory in a project root.
mkdir .ebextensions
cd .ebextensions
nano django.config
In the .ebextensions directory, add a configuration file named django.config with the following text.
Example ~/ebdjango/.ebextensions/django.config, and add the following.
Note: Make sure to change the ebdjango with your project name.
option_settings:
  aws:elasticbeanstalk:container:python:
    WSGIPath: ebdjango/wsgi.py
Important: If we don’t want our elastic beanstalk environment to create auto-scaling and load balancer by default, we can use the following set of codes in option_settings, this will create a single instance and prevent auto-scaling and load balancer.
option_settings:
    aws:elasticbeanstalk:container:python:
        WSGIPath: ebdjango/wsgi.py
    aws:elasticbeanstalk:environment:
        EnvironmentType: SingleInstance
2. Procfile
nano Procfile
web: gunicorn ebdjango.wsgi
3. Wsgi.py
nano wsgi.py
Add the following code in the python file, else you can copy the contents from /project/wsgi.py file.
import os
from django.core.wsgi import get_wsgi_application
os.environ.setdefault('DJANGO_SETTINGS_MODULE', 'ebdjango.settings')
application = get_wsgi_application()
4. Main.py
nano main.py
from ebdjango.wsgi import application
app = application
Step 2: Now push everything to GitHub.
git add .
git commit -m "postgres and eb conf"
git push
Step 3: Now we can deactivate the virtual environment.
deactivate
Create Elastic Beanstalk App and Environment
Now we can create a Django application environment and deploy the configured application with Elastic Beanstalk.
Step 1: Initialize your EB CLI repository with the eb init command.
eb init -p python-3.8 django-app
Here, initialize the application with python 3.8 as the other 3.7 version shows an error while creating an environment.
Step 2: Now, the AWS asks for an AWS access key and secret key, go to your AWS console and click on your account, and then to security credentials. Here you need to create a new key, if you have one already you can use that.

Step 3: Now, initialize the eb, this option is however optional but it’s good practice to use this as we might need to SSH to our environment if any error occurs while deploying.
eb init
(n to code commit, y to SSH)
Step 4: Next, create a Django environment.
eb create django-env
Important: To create a Django environment without a Load balancer, for cost-cutting.
eb create -s django-env

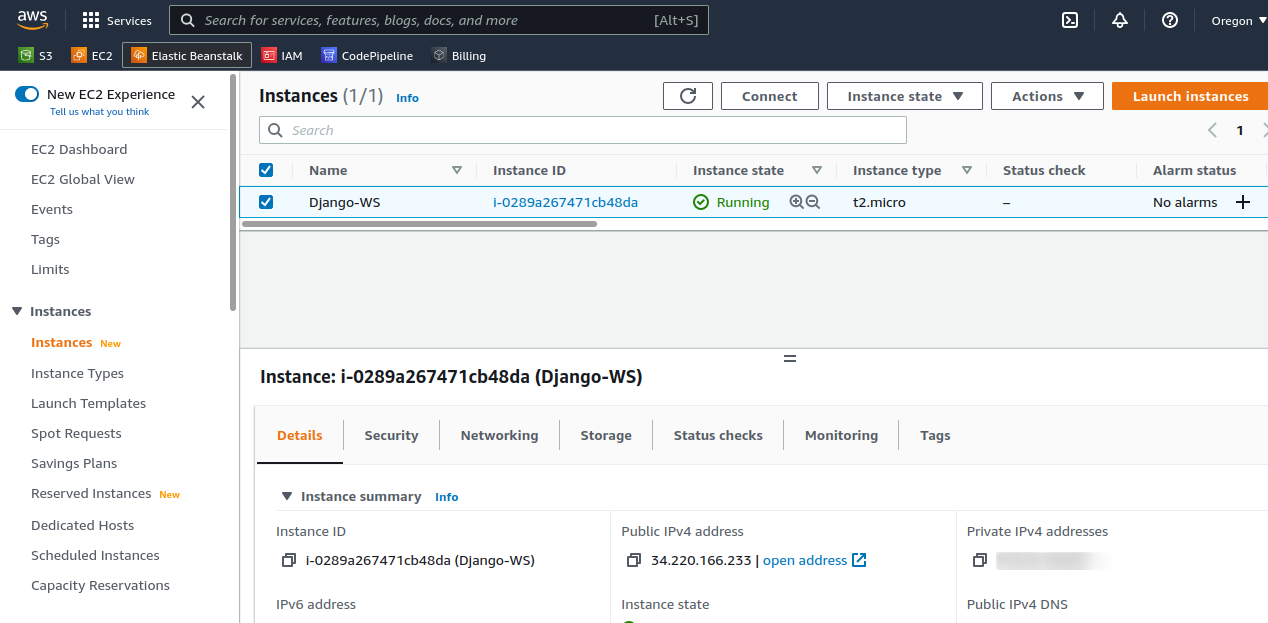
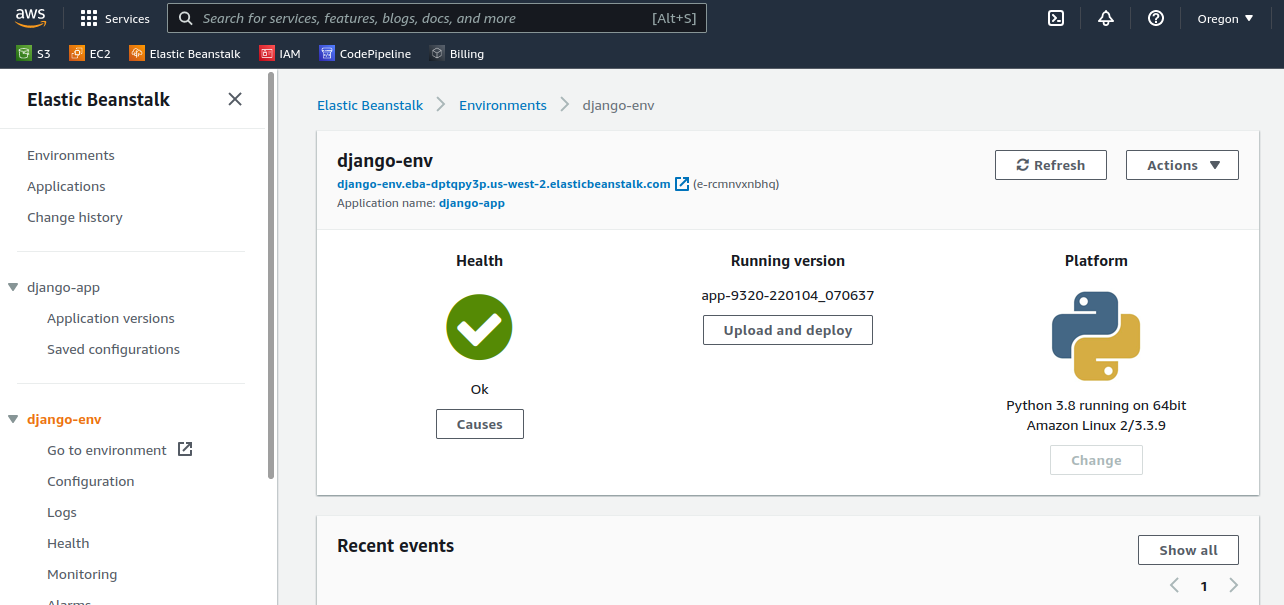
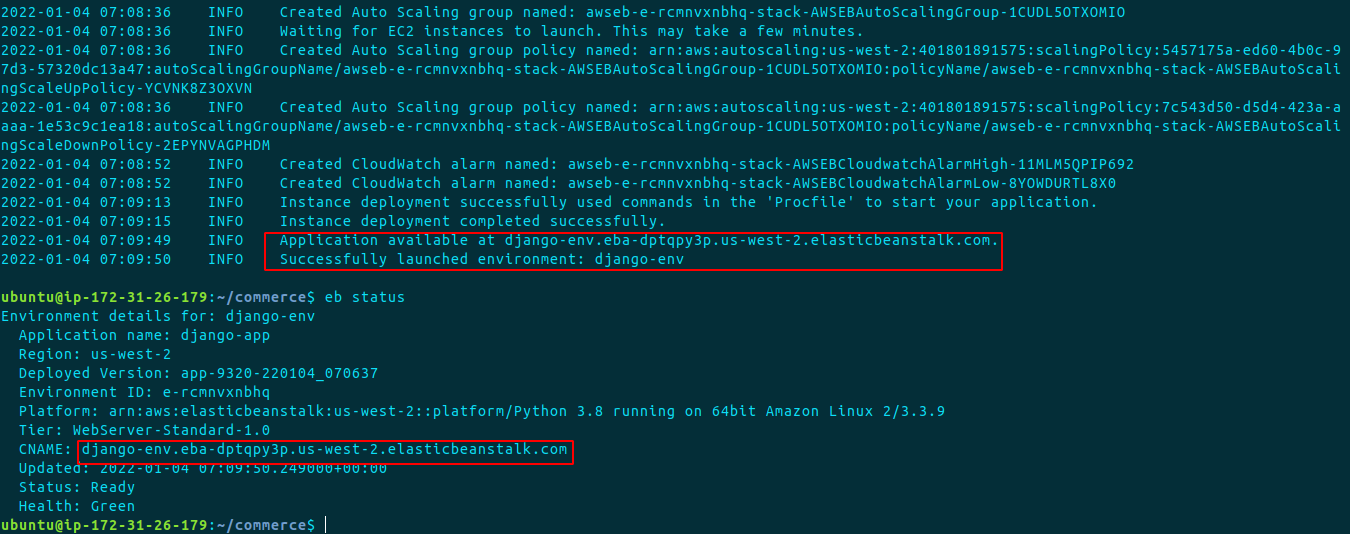
After a successful environment deployment, you should see an application environment instance running in us-west-2 (default region). The health green status says we are doing good at this point however there are configurations left.
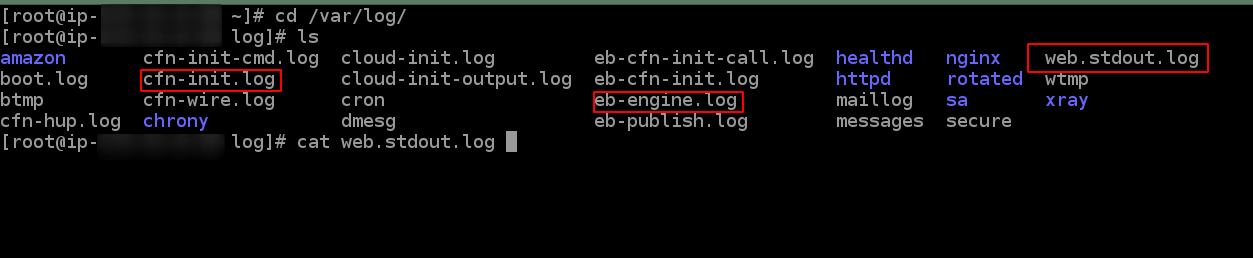
Note: If you get any error during the process, you can always go to the environment instance and check the eb-engine and web.stdout.log available at /var/log/.
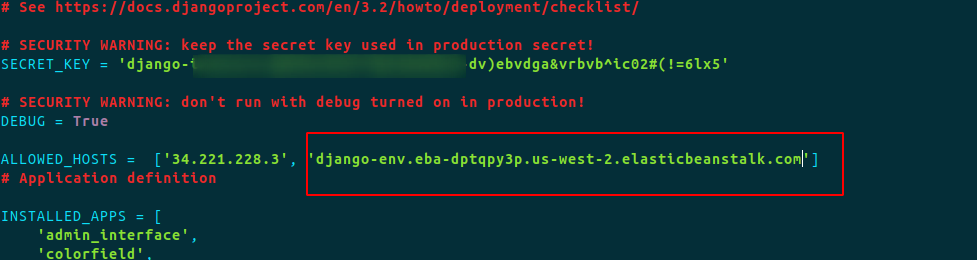
If you try to go to the application URL at this point, you should see an error message saying the disallowed host and the application URL. By now you should know what should be done.
Go to project, and then to settings.py and add the CNAME of the application in the allowed host.
- To get the CNAME and status of the elastic beanstalk environment use the following command.
eb status
2. Adding to Django environment CNAME to Allowed host:
Step 5: Now you need to push the code to GitHub and deploy the application to elastic beanstalk again.
git add .
git commit -m "eb deployment"
git push
After pushing it to GitHub, run the command.
eb deploy
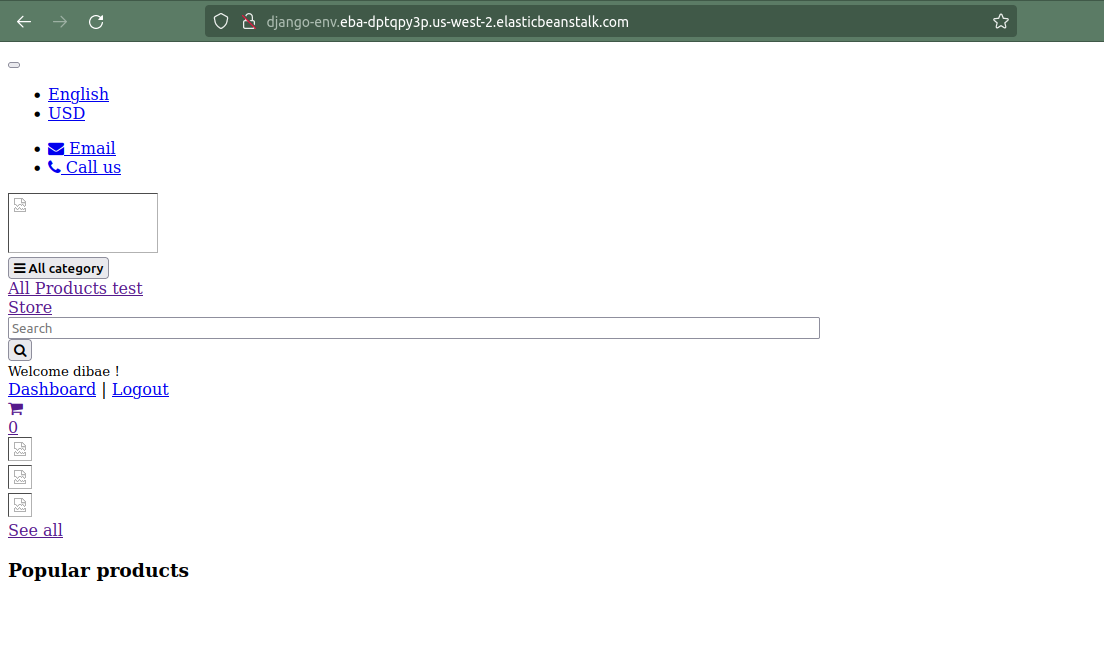
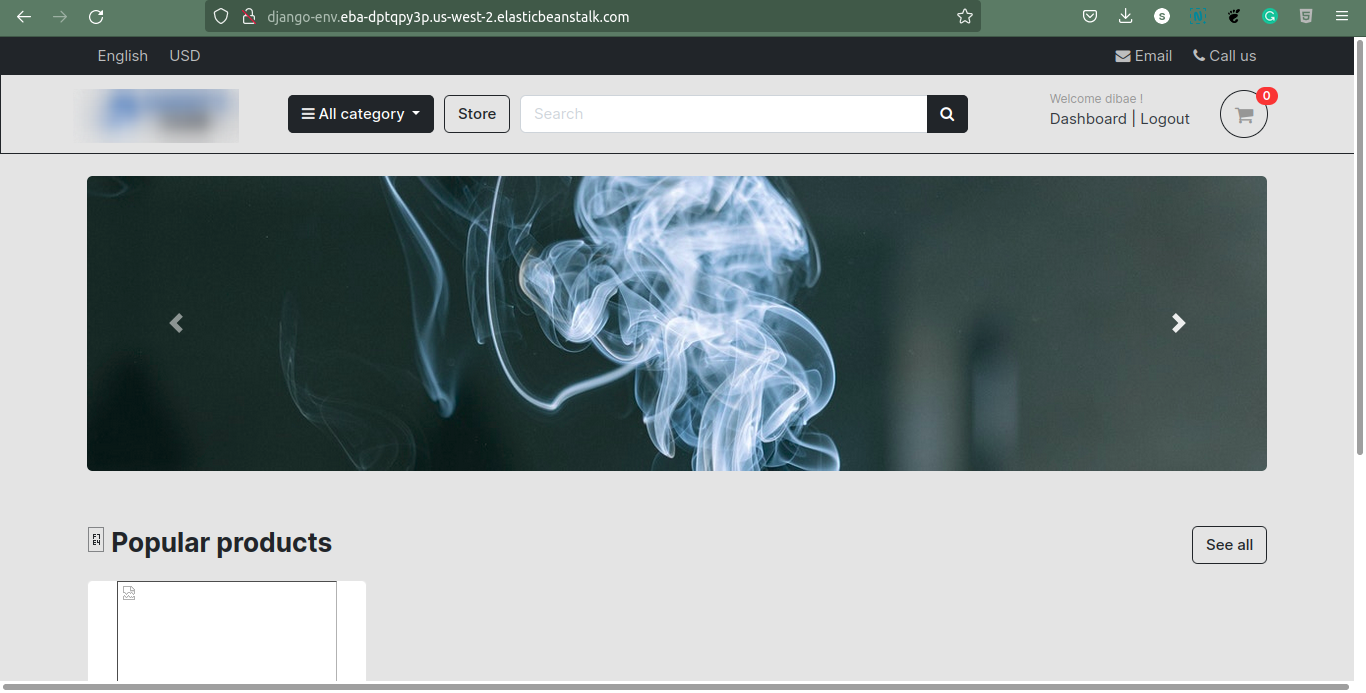
As the deployment succeeds, you should see the application running in the available CNAME.
AWS S3 for Static and Media Files
Serving Static Files
As we see, the static files are not being served here properly, let’s configure it with an S3 bucket.
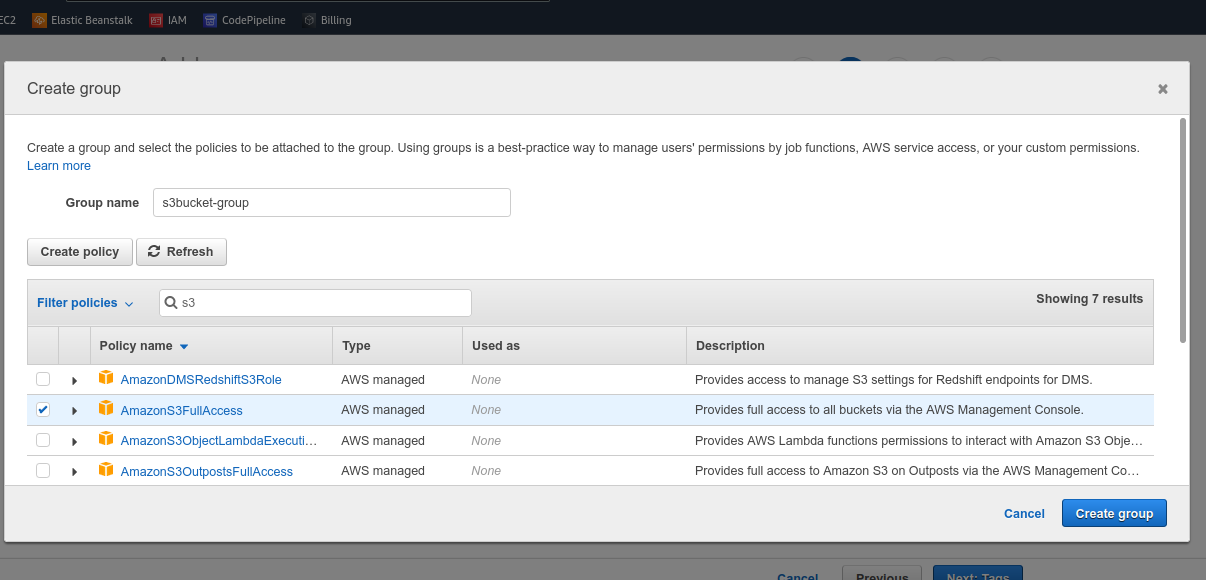
Step 1: We need permission from IAM to grant an S3 bucket thus create one. Here grant full s3 permission to the user group.
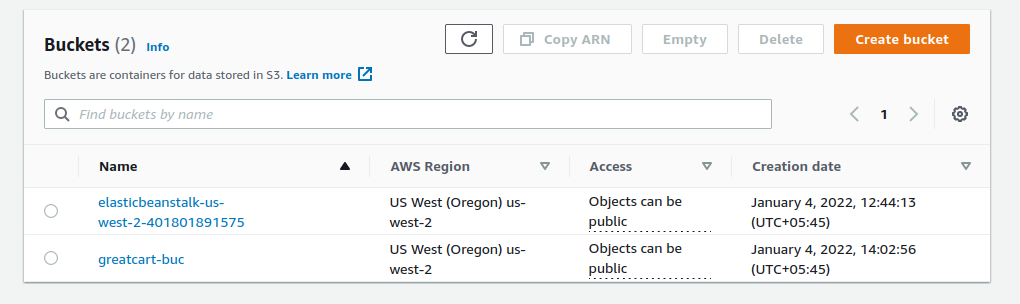
Step 2: Next, go to the S3 service and create a bucket. (The elastic beanstalk creates one bucket at the time of creating an environment, thus keep it as it is and create new buckets for static and media files)
While creating a bucket, provide a unique bucket name, and uncheck the block public access service, as we will be accessing it from anywhere.
Step 3: Now we need to move our local files from VPS to the bucket. For that, we need to configure the S3 bucket at our project level.
- Packages needed to configure the S3 bucket are boto3 and django-storages. You should already have it installed through the requirements.txt previously.
- On the installed apps, add the application ‘storages’.

3. Now, on the settings.py add the following S3 static configuration. (STATICFILES_DIR can be ‘projectDirectory/static’ if the terminal throws an error, basically you need to provide the path to the static directory.)
from decouple import config

#AWS S3 Static Files Configuration
AWS_ACCESS_KEY_ID = config('AWS_ACCESS_KEY_ID')
AWS_SECRET_ACCESS_KEY = config('AWS_SECRET_ACCESS_KEY')
AWS_STORAGE_BUCKET_NAME = config('AWS_STORAGE_BUCKET_NAME')
AWS_S3_CUSTOM_DOMAIN = '%s.s3.amazonaws.com' % AWS_STORAGE_BUCKET_NAME
AWS_S3_OBJECT_PARAMETERS = {
   'CacheControl': 'max-age=86400',
}
AWS_S3_FILE_OVERWRITE = False
AWS_DEFAULT_ACL = 'public-read'
AWS_LOCATION = 'static'
STATICFILES_DIRS = [
   'static',
]
STATIC_URL = 'https://%s/%s/' % (AWS_S3_CUSTOM_DOMAIN, AWS_LOCATION)
STATICFILES_STORAGE = 'storages.backends.s3boto3.S3Boto3Storage'
The best practice is to use a .env file to store the key_values, thus create a .env file in the project root and add the following (if not).
nano .env
AWS_ACCESS_KEY_ID=KEY_HERE
AWS_SECRET_ACCESS_KEY=KEY_HERE
AWS_STORAGE_BUCKET_NAME=BUCKET_HERE
4. Now, we need to run the collectstatic command.
python3 manage.py collectstatic
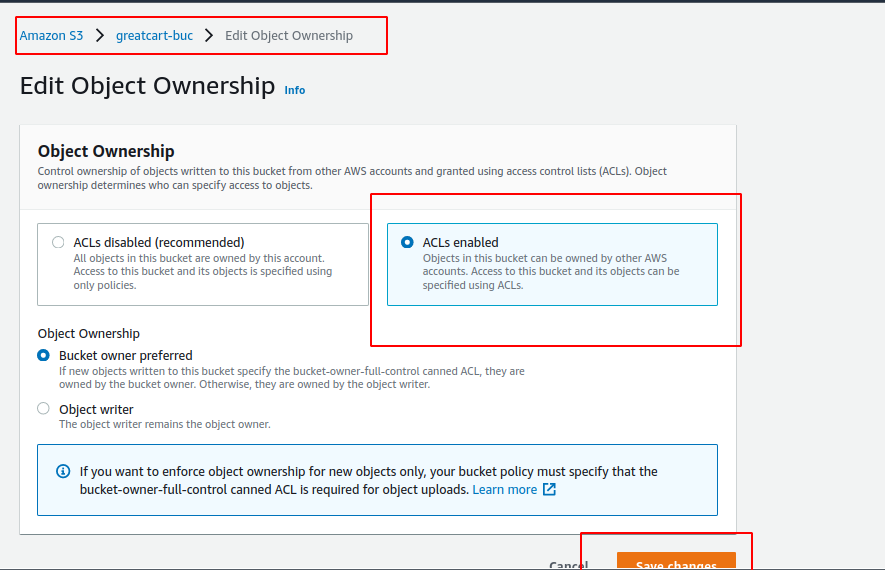
Note: If you get an issue related to ACL, you might need to enable ACL from the bucket permission.
Now run collect static commands.
python3 manage.py collectstatic
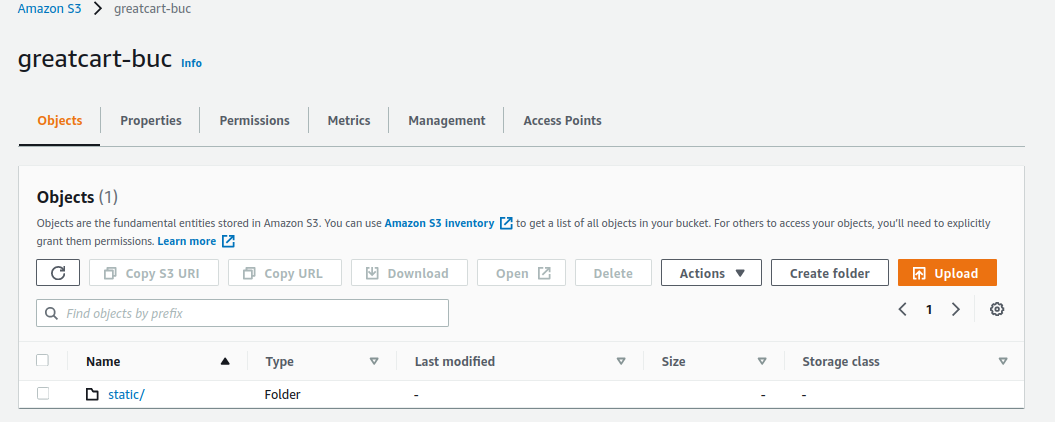
After that, you should see a static folder inside the S3 bucket.
Step 4: Again push the code to GitHub and run eb deploy, you should see the application running.
Something’s missing? Yes, the media files in the S3 bucket. Let’s be quick and fix it.
Serving Media Files
We also want our media files to serve through the S3 bucket. To do this, let’s make a python file inside the project level.
Step 1: Create media_storages python file.
nano project/myapp/media_storages.py
Inside the python file, paste the following MediaStorage class.
from storages.backends.s3boto3 import S3Boto3Storage

class MediaStorage(S3Boto3Storage):
    location = 'media'
    file_overwrite = False
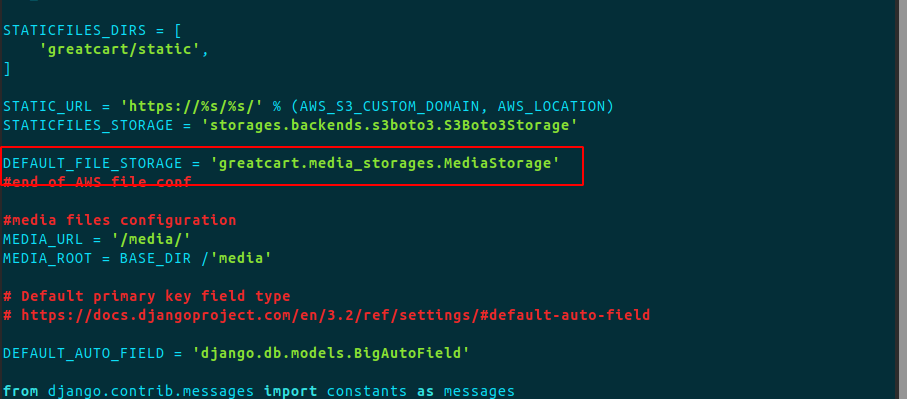
Step 2: Also, in the settings.py file, define the default file storage path, replace ProjectName with your project name.
DEFAULT_FILE_STORAGE = ProjectName.media_storages.MediaStorage'
Step 3: At last, we need to upload the media files to the S3 bucket.
You can simply drag and drop the /media folder inside the S3 bucket. Also, you need to allow the media files to be public.
Tips: We are doing all these changes in the server, so to upload the media files, you can push all code to GitHub, and clone the repository in your local machine, through the local machine, it should be easy to upload the media file to the S3 bucket.

Step 4: Now let’s deploy the environment again.
eb deploy
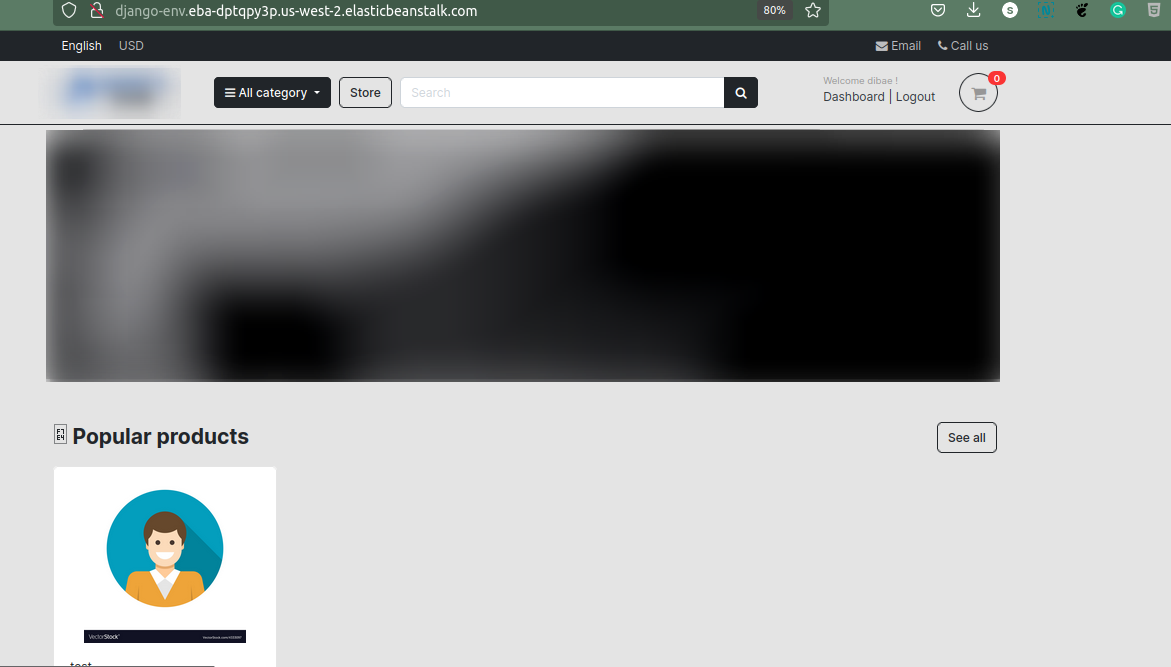
Now you should have a fully-fledged site deployed in Elastic Beanstalk.
CodePipeline the Django App
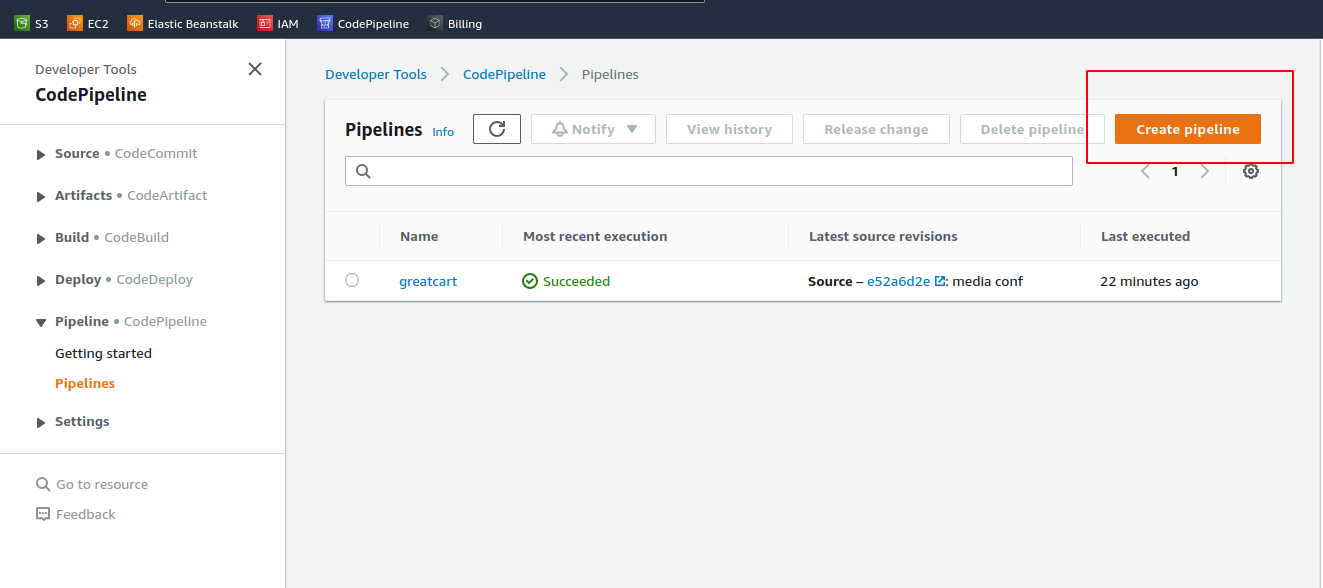
Since we have come this far deploying our eCommerce Django app with elastic beanstalk, now it’s a good time to implement a code pipeline to the project. The Codepipeline enables auto-trigger the builds of the artifacts when a code is pushed to a GitHub, follow the following comprehensive guide.
Step 1: Log in to AWS and find a service, CodePipeline. Now, create a new pipeline
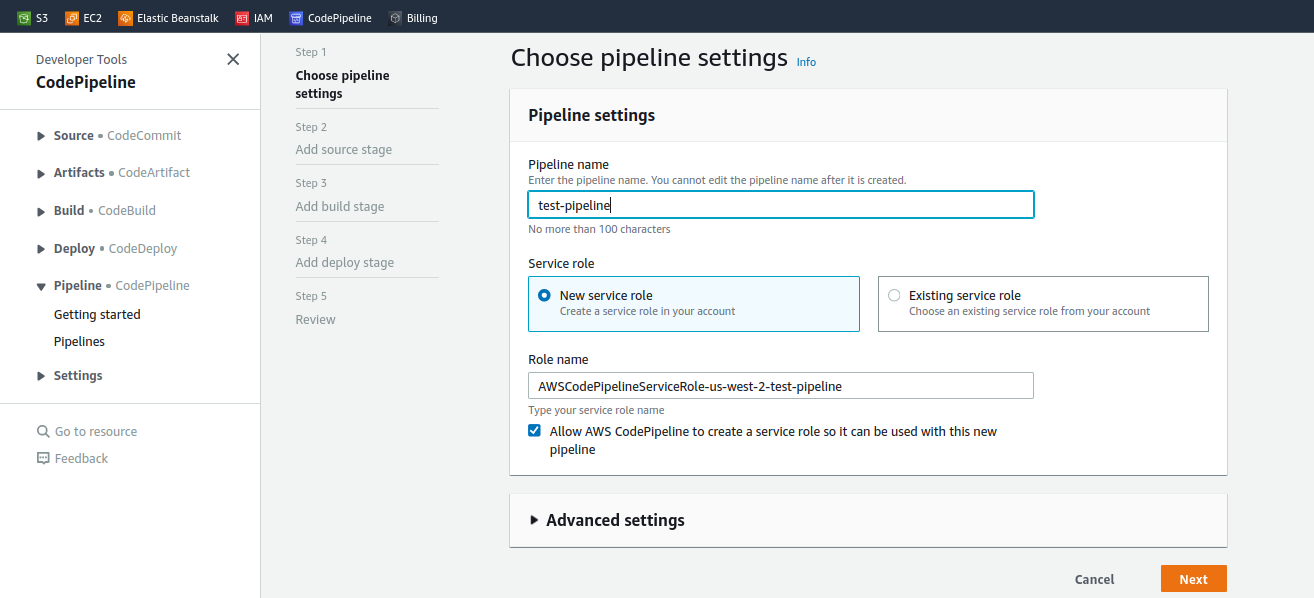
Step 2: On the pipeline setting, provide a name and leave others default.
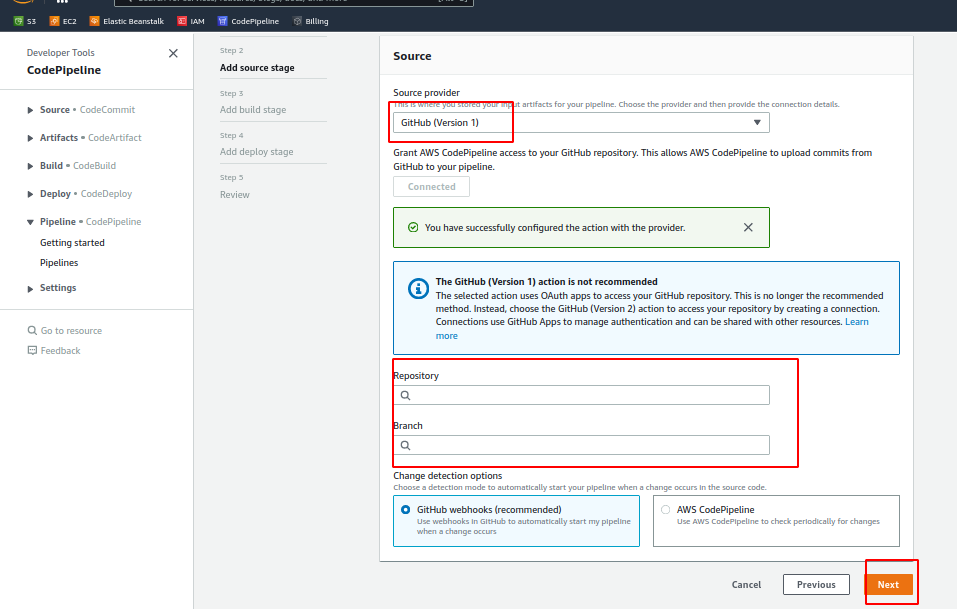
Step 3: Next, on the source, use GitHub(version1), and authenticate CodePipeline with GitHub. Here select the repository and the branch we used to deploy on the elastic beanstalk.
Note: If you are trying to add a repository that resides in an organization without your GitHub account, you need to grant permission for the organization manually.
To do so, go to your GitHub profile => Settings => Applications => AWS CodePipeline, and click the Grant access button for each applicable organization.
Step 4: On the next step, skip the build step as we don’t need to build our Django app again and again.
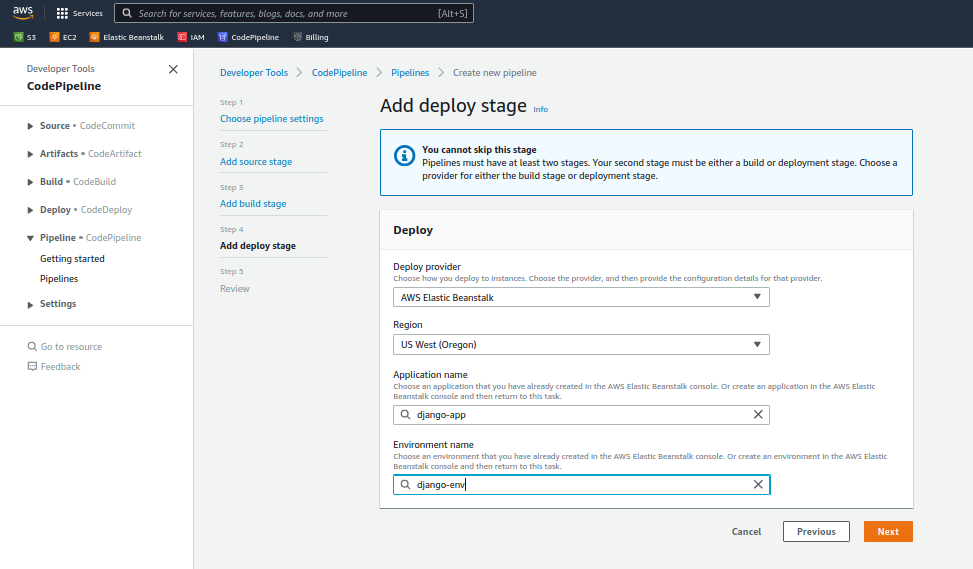
Step 5: On the deploy stage, choose elastic beanstalk and select the app and environment we configured previously. Click on next, this should begin deploying our project.
Step 6: Wait a while when the deploy stage pulls the source and deploys.
 Finally, we are done with the whole CI/CD pipeline of Django applications. When you make any changes from any machine and push to GitHub, the CodePipeline triggers a new build and deploys code automatically.
Installing SSL certificate to our Domain Name
By now you should have already purchased a domain name and pointed to the Elastic Beanstalk CNAME or the A record. Now, we are looking into how we can add SSL to the domain name for free using Certbot.
Amazon Linux 2 uses python version 2
Instead of using snapd as suggested by Certbot, we can directly install Certbot, which is an easy way around because AWS Linux 2 doesn’t support snapd to be installed.
sudo apt-get install python-certbot-nginx
sudo certbot --nginx
- Agree to the Certbot policy (y)
- Add your email address
- Next, you may deny (n) the promotional email and newsletter from Certbot
- Add your domain (even if it says not available)
After installation, you need to run Nginx -t with sudo:
sudo nginx -t
If you get Syntax OK try restarting Nginx:
systemctl restart nginx
Then check if it is listening on port 443 (HTTPS):
netstat -plant | grep 443
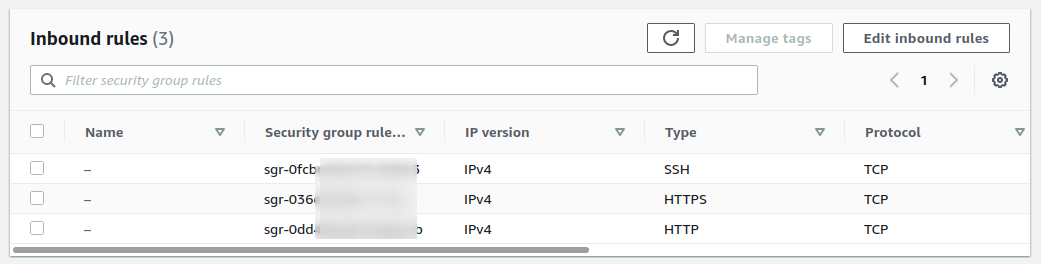
Now, go to the instances, and there go to the security group of the respective Elastic Beanstalk security group. In the inbound rules, edit the rule and add HTTP and point it to anywhere and save the changes. Now your site is ready to be served with HTTPS.
Next Steps: AWS Cost Optimization
We often hear from people around the globe facing huge spikes in AWS usage, and everyone is facing a far from the clear situation. AWS usage patterns are always changing, but what you spend on AWS should always be optimized. There are things you should do for AWS Cost Optimization.
Cloudlaya offers a resilient cloud cost intelligence solution that organizes charges and displays insights by automatically correlating billing and resources across your AWS account. Instead of wasting time figuring out what’s causing cost anomalies, you may get right to work and leave us to work on AWS cost optimization. Contact us today to learn how Cloudlaya can help your business save money on AWS.

As a seasoned DevSecOps Consultant, I specialize in ensuring the reliability, scalability, and security of cloud infrastructure and applications that are crucial for my clients’ success.


Hello,
Please I just want to ask that is the above configuration using apache web server or its using nginx with gunicorn? I asked because nginx was not configured anywhere until it was time to configure ssl with certbot.
Hi, sorry for reply you late.
The Ebs configuration is using Nginx by default, however, you can change it (Nginx or Apache) at the Application environment configuration tab.