Using Auto-Scaling and Load Balancing for High Availability
In this post, we’ll go through the definition of High Availability and how to quantify it in IT systems. We’ll show you how AWS computing services can help you achieve high availability for cloud workloads.
Table of Contents
What Does It Mean to Have a High Availability?
Highly available systems are reliable in the sense that they continue to function even if essential components fail. They’re also robust, which means they can endure failure without causing service disruption or data loss, and they can recover quickly.
The percentage of uptime is a standard metric for determining high availability. The number “nine” is frequently used to represent a high level of availability. For example, “four nines” denotes a system that is operational 99.99% of the time, implying that it is down for only 52.6 minutes every year.
AWS High Availability: Compute, Databases, and Storage
Using Auto Scaling Groups to Achieve High Availability in AWS
AWS Auto Scaling monitors your applications and automatically adjusts capacity to maintain steady, predictable performance at the lowest possible cost. Using AWS Auto Scaling, it’s easy to set up application scaling for multiple resources across multiple services in minutes.
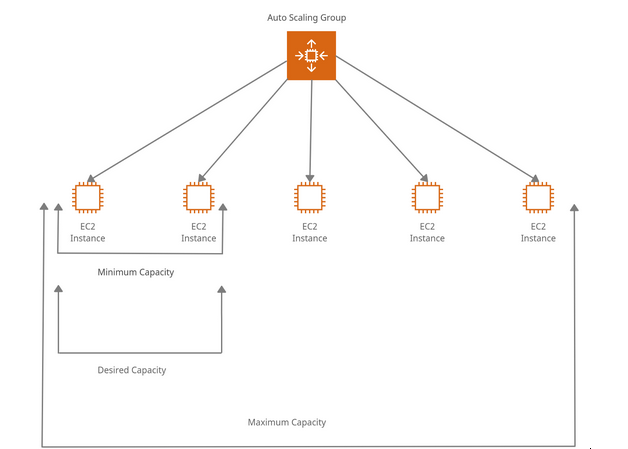
To achieve 0% downtime with our servers, I’ll be designing a launch configuration that employs auto-scaling groups. To reach the necessary performance, the auto-scaling group will add or delete instances as needed.
As seen in the figure below, we will have a minimum of 2 and a maximum of 5 cases in this experiment. The ability to scale up and down automatically is a big advantage of utilizing AWS. Auto-scaling will allow a corporation to develop infrastructure without knowing exactly how much capacity it would require.
Step 1: First, we will navigate to the EC2 dashboard by typing EC2 in the search bar and selecting the EC2 service.
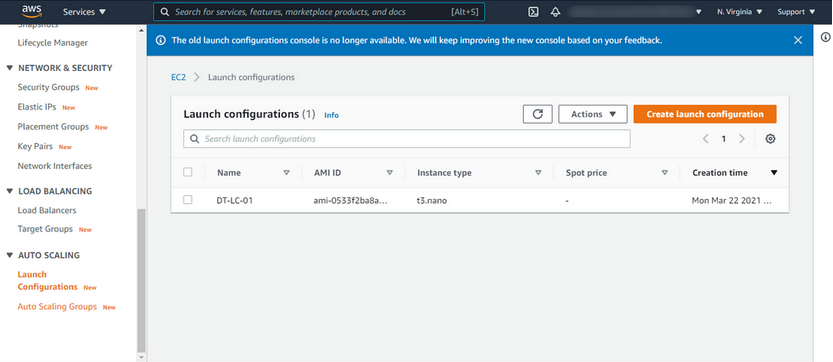
I would suggest going through the process of launching an instance first to be able to copy the AMI of the instance that you wish to use. You will not need to launch the instance but the first step of that process will allow us to copy the AMI of the instance we wish to use. I have an example above to clarify what needs to be copied. After that, when we begin to set up the launch configuration we can paste it in to make it simple to select our AMI for the launch configuration.
To achieve 0 percent downtime with our servers, I’ll be designing a launch configuration that employs auto-scaling groups. To reach the necessary performance, the auto-scaling group will add or delete instances as needed.
As seen in the figure above, we will have a minimum of 2 and a maximum of 5 cases in this experiment. The ability to scale up and down automatically is a big advantage of utilizing AWS. Auto-scaling will allow a corporation to develop infrastructure without knowing exactly how much capacity it would require.
Step 2: First, we will navigate to the EC2 dashboard by typing EC2 in the search bar and selecting the EC2 service.
I would suggest going through the process of launching an instance first to be able to copy the AMI of the instance that you wish to use. You will not need to launch the instance but the first step of that process will allow us to copy the AMI of the instance we wish to use. I have an example above to clarify what needs to be copied. After that, when we begin to set up the launch configuration we can paste it in to make it simple to select our AMI for the launch configuration.
Step 3: Now, we want to navigate back to the EC2 service and scroll down to the auto-scaling section in the EC2 panel on the left as shown above to create a launch configuration. Once we click create launch configuration we should see a screen similar to the one below. We can then begin to set the details we wish to have for the launch configuration.
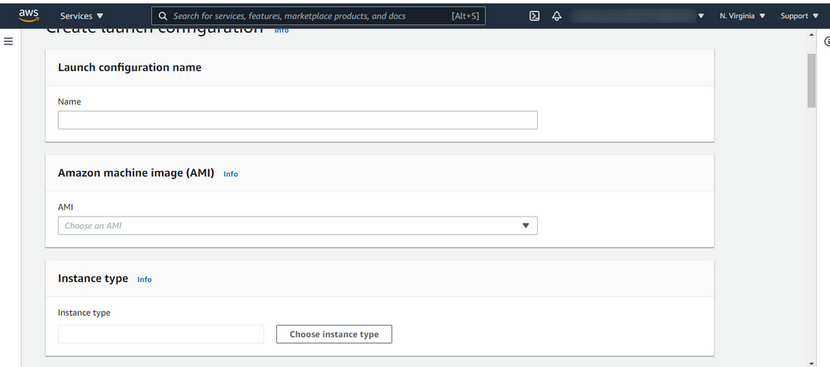
Provide a name for the launch configuration being created. The AMI field is where we can paste in the AMI we copied earlier. Next, select the type of instance you wish to use. In the additional configuration menu, I kept all options default but I did select the advanced details option.
Here I kept all the defaults as well but I did write a script in the user data section to automatically update the server and start httpd. In the user data section, we can write scripts to have our instances run commands and handle tasks for us automatically. This is very useful when you are launching multiple instances and will save time on handling simple tasks repeatedly.
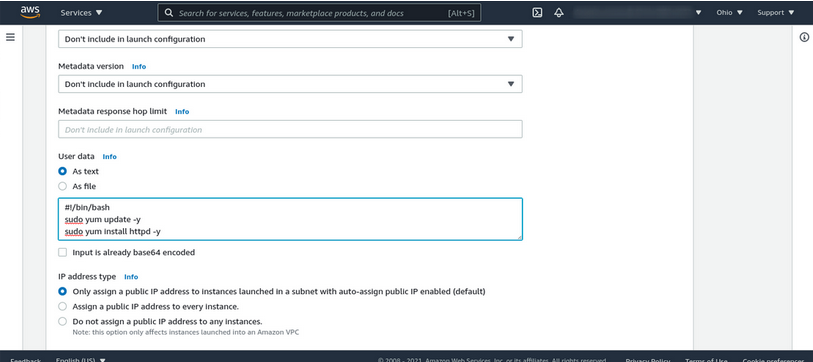
Continue through each option editing it to fit your needs. In the section for security groups, we will be selecting an existing security group as it already has the rules I need for this lab. After you configure the security groups that you will need for your environment. Choose the key pair you wish to use and check the box acknowledging that you have access to the key pair. Before we create this launch configuration, review everything to be sure all is as it should be and click create.
Step 4: The time has come for us to create our auto-scaling group. This will be where we can achieve high availability for our servers. We will have a minimum of 2 and a maximum of 5 servers. The auto-scaling group will add or remove instances as needed to achieve the desired usage. In the EC2 dashboard select the auto-scaling group tab in the panel on the left. It will be under the launch configuration option in the auto-scaling tab.
Now, we will be directed to a new page after you click on the auto-scaling group option. Once we are presented with a new page we must click on create an auto-scaling group. We should see a screen with an output similar to the one below:

Give your auto-scaling group a name. Next, we need to go to the launch template field and click the option to “switch to launch configuration” to select the launch configuration you created. Configure your settings as you wish, but be sure to pick the correct VPC and subnets.
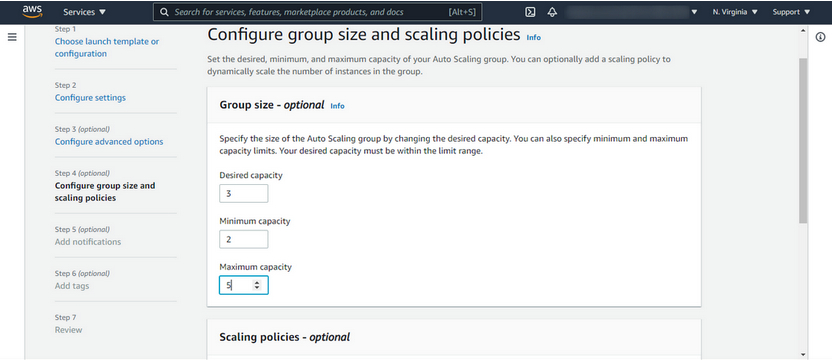
Step 5: Here we will provide the desired minimum and maximum capacity for the instances in the auto-scaling group. I selected to use a target tracking scaling policy to meet the demand I wish to have for my CPU utilization. This will allow for the auto-scaling group to add instances when the usage is high and subtract instances when the usage is low. For example, if your servers are busier in the day, you may need 4 or 5 to handle the demand and remain at the desired CPU utilization.
In the same way, if your servers are not experiencing high demand and under the desired usage, you will want to remove any unused servers to save money. After you have configured your group size and scaling policies, click next to move onto notifications and tags. You can provide these as you wish to help identify the auto-scaling group.
I will be continuing without these steps as this is just a lab. Once you are done with all the steps review your auto-scaling group and make sure everything is as it should be, then click create an auto-scaling group
We can now stress test the auto-scaling under the Linux system.
sudo apt-get install stress -y //debian
yum install stress -y //AWS AMI
After its installation, we can fire the command:
uptime
Sudo stress  -- cpu 4 --timeout 20
The CPU usage of the instance will increase, and eventually, we can see the new instance being launched to provide high availability based on the function we imposed while configuring the launch template.
Using Load Balancer to Achieve High Availability in AWS
Likewise, load balances are servers that forward traffic to multiple servers (e.g EC2 instances) downstream.
Why use a Load Balancer?
- Spread load across multiple downstream instances
- Expose a single point of access (DNS) to your application
- Seamlessly handle failures of downstream instances
- Do regular health checks to your instances
- Provide SSL termination (HTTPS) for your websites
- Enforce stickiness with cookies
- High availability across zones
- Separate public traffic from private traffic
AWS has 4 kinds of managed Load Balancers:
- Classic Load Balancer (v1- old generation)
HTTP, HTTPS, TCP,SSL (secure TSP)
- Application Load Balancer (v2- new generation)
HTTP, HTTPS, WebSocket
- Network Load Balancer (v2- new generation)
TCP, TLS (secure TCP), UDP
- Gateway Load Balancer
operated at layer 3 (network layer)-IP Protocol
This tutorial provides a hands-on introduction to Application Load Balancers through the AWS Management Console.
Before you begin
- Decide which two Availability Zones you will use for your EC2 instances.
- Launch at least one EC2 instance in each Availability Zone.
- Be sure to install a web server, such as Apache or Internet Information Services (IIS), on each EC2 instance.
- Ensure that the security groups for these instances allow HTTP access on port 80.
Steps: To create an Application Load Balancer
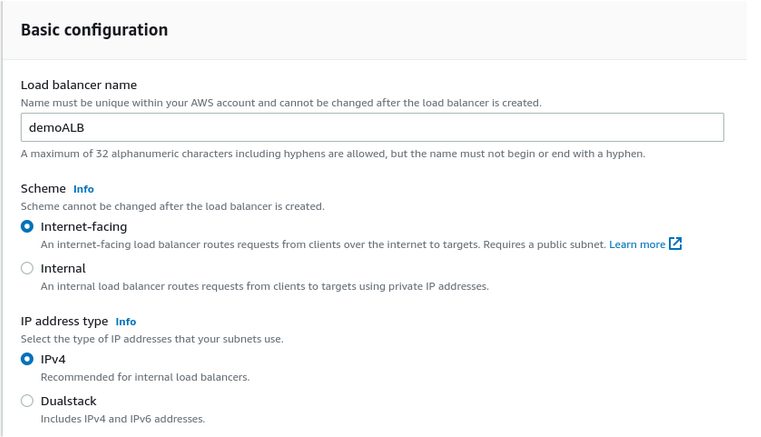
Step1: In the navigation pane, under Load Balancing go to load balancers > click create under Application Load Balancer > give name(DemoALB) > choose scheme: internet facing > ip address type: IPv4 > VPC containing your instances.
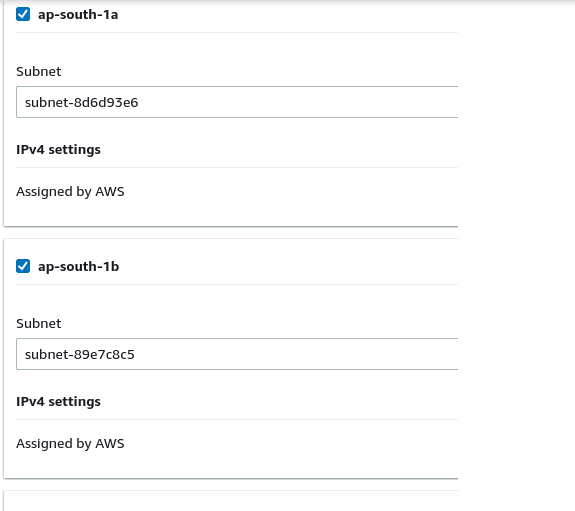
Step2: Check mark all subnets > Choose or create a security group.
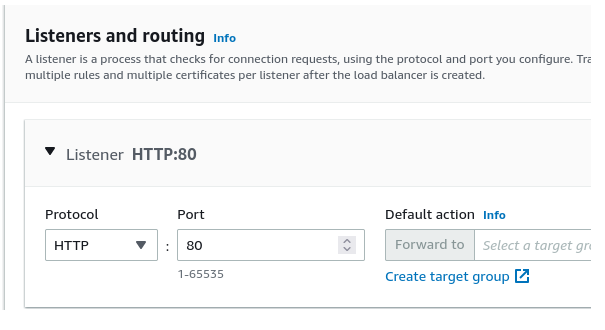
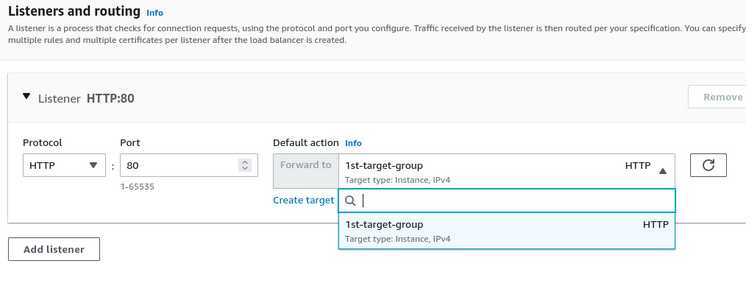
Step3: Now, configure your targets. Under listeners and routing choose “Create target group.”
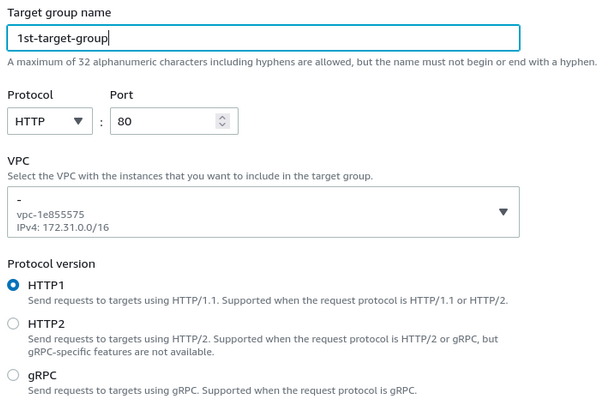
Step 4: Keep the Target type as instance> enter a name for the new target group > Keep the default protocol (HTTP) and port (80) > Select the VPC containing your instances > Keep the protocol version as HTTP1 > For Health checks, keep the default settings > Choose Next.
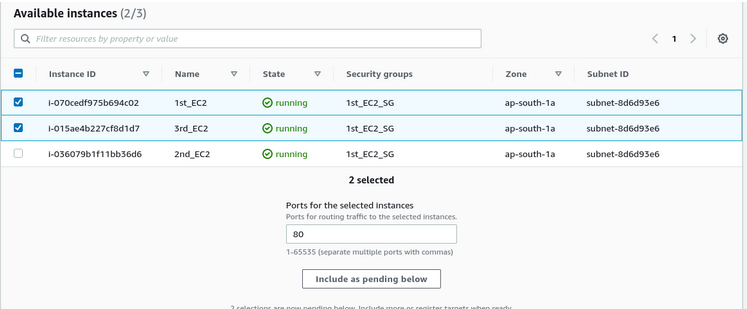
Step 5: On the Register targets page, for available instances, select one or more instances> Keep the default port 80, and choose Include as pending below> Choose Create target group.
Step 6: Back to the listeners, now back in listener refresh and select just created target group > create load balancer > view load balancer.
Steps 7: To test your load balancer
After creating the load balancer, verify that it’s sending traffic to your EC2 instances.
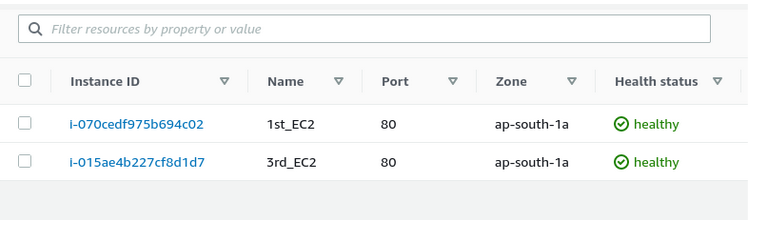
- In the navigation pane, under Load Balancing, choose Target Groups.
- Select the newly created target group.
- Choose Targets and verify that your instances are ready.
If the status of an instance is initial, it’s probably because the instance is still in the process of being registered, or it has not passed the minimum number of health checks to be considered healthy. After the status of at least one instance is healthy, you can test your load balancer.
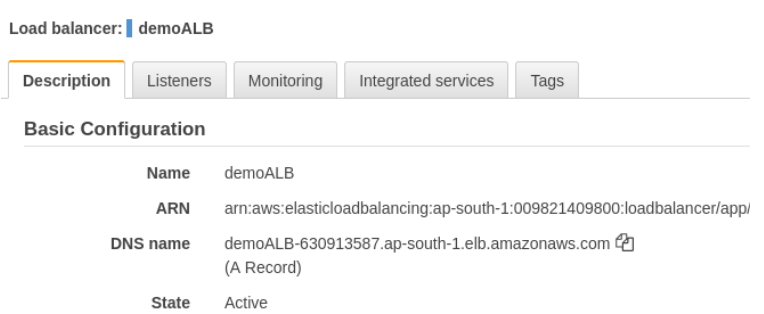
4. In the navigation pane, under Load Balancing, choose Load Balancers.
5. Select the newly created load balancer.
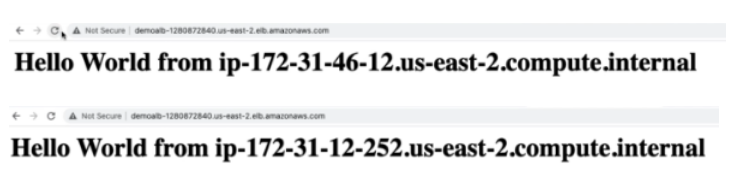
6. Choose Description and copy the DNS name of the load balancer (for example, demoalb-630913587.ap-south-1.elb.amazonaws.com).
 7. Paste the DNS name into the address field of an internet-connected web browser.
8. If everything is working, the browser displays the default page of your server.
9. Everytime you refresh the browser your request goes to a different EC2 instance and you get hello world from a different EC2 which means your load balancer is load balancing your request.
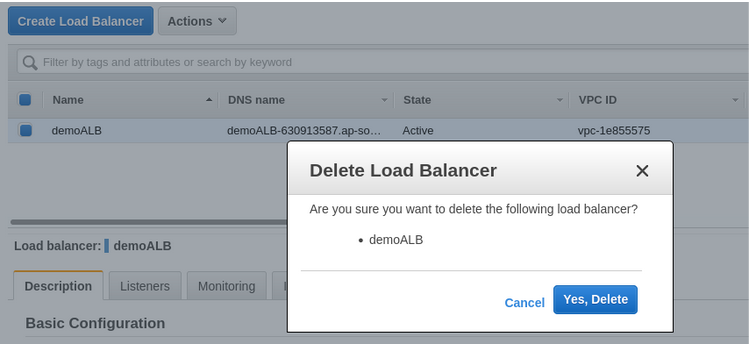
Steps: To delete your load balancer
As soon as your load balancer becomes available, you are billed for each hour or partial hour that you keep it running. When you no longer need a load balancer, you can delete it.
- Open the Amazon EC2 console
- In the navigation pane, under Load Balancing, choose Load Balancers.
- Select the checkbox for the load balancer, choose Actions, then choose Delete.
- When prompted for confirmation, choose Yes, Delete.
The power cloud can be realized when the server implements High Availability and Scalability features. Without a doubt, AWS provides the best services to maintain zero to none downtime. We here at Cloudlaya provide the best AWS solution and consulting. Our team is passionate to be your next AWS consultant, contact us today to get a free quote.

As a seasoned DevSecOps Consultant, I specialize in ensuring the reliability, scalability, and security of cloud infrastructure and applications that are crucial for my clients’ success.