What is Kubernetes and How to Get Started?
Kubernetes is an Open Source Orchestration system for Docker containers. Kubernetes is implemented by Google. It is a platform that eliminates the manual processes involved in deploying containerized applications. Kubernetes are used to manage the State of Containers.
- Start Containers on Specific Nodes.
- Restart Containers when they are Killed.
- Move containers from one Node to Another.
Table of Contents
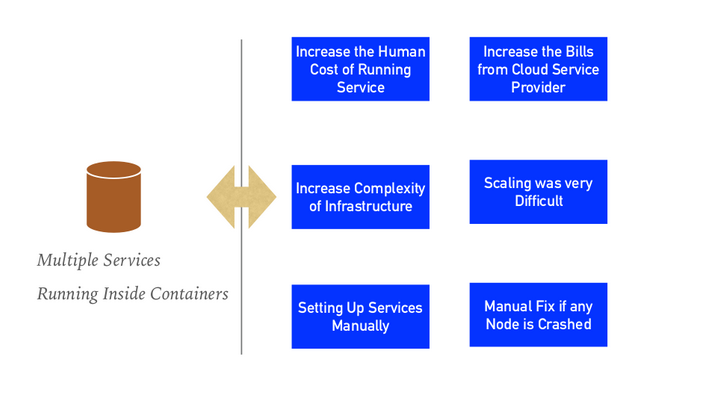
Why are Orchestration tools needed?
Kubernetes helps in automating the manual tasks, following can be an issue if orchestrating tools are not used:
- Increase the human cost of running service.
- Increase the bills from the cloud service provider
- Increase the complexity of infrastructure
- Scaling was very difficult
- Setting up services manually
- Manual fix if any node is crashed
Features of Kubernetes
Automated Scheduling
Kubernetes provides advanced schedulers to launch containers on cluster nodes based on their resource requirements and other constraints.
Healing Capabilities
Kubernetes can replace and reschedule containers when nodes die. Kubernetes doesn’t allow Containers to be used until they get ready.
Auto Upgrade and RollBack
Kubernetes rolls out changes to the application or its configuration. Monitoring Application ensures that Kubernetes doesn’t kill all Instances at that time. If something goes wrong, with Kubernetes you can roll back the change.
Horizontal Scaling
Kubernetes can scale up and scale down the application as per the requirements with a simple command, using a UI, or automatically based on CPU usage.
Storage Orchestration
With Kubernetes, you can mount the storage system of your choice. You can either opt for local storage or choose a public cloud provider.
Secret & Configuration Management
Kubernetes can help you deploy and update secrets and application configuration without rebuilding your image and without exposing secrets in your stack configuration.
You can Run Kubernetes Anywhere
- On-Premise(Own DataCenter)
- Public Cloud(Google, AWS, Azure, DigitalOcean…)
- Hybrid Cloud
Kubernetes Architecture
Kubernetes follow the Master-Slave(Worker) Node Architecture.
Master Node is responsible for the management of the Kubernetes cluster. It is mainly the entry point for all administrative tasks. There can be multiple master nodes in the Kubernetes cluster.
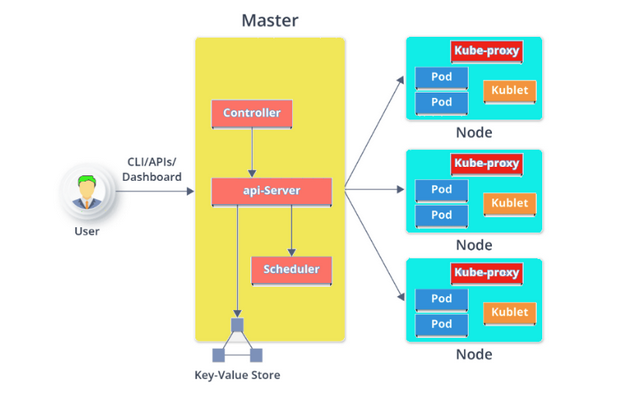
Master Node
The master node is the Entry Point for All Administrative Tasks. Multiple Masters can be possible. In the Multi-Master Node System, single master nodes will be commanding Node for their own workers and other Masters too. Main Master Node uses ETCD to manage the Workers and Other Master Nodes.
API Server
The API server is the entry point for all the REST commands used to control the cluster. The resulting state of the cluster is stored in the distributed key-value store.
Controller
Regulates the Kubernetes cluster which manages the different non-terminating control loops. Performs lifecycle functions such as namespace creation, event garbage collection, node garbage collection, etc.
The controller watches the desired state of the objects it manages and watches their current state through the API server. If the current state of the objects it manages does not meet the desired state, then the control loop takes corrective steps to make sure that the current state is the same as the desired state.
Scheduler
Regulates the tasks on slave nodes. It stores the resource usage information for each slave node. Schedules the work in the form of Pods and Services.
ETCD (/etc distributed)
Distributed key-value store which stores the cluster state. Can be part of the Kubernetes Master, or, it can be configured externally. It’s mainly used for shared configuration and service discovery.
Worker Node
It’s a physical server or you can say a VM which runs the applications using Pods. Worker nodes contain all the necessary services to manage the networking between the containers, communicate with the master node, and assign resources to the scheduled containers.
Kubelet
It is an agent which communicates with the Master node and executes on nodes or the worker nodes. Kubelet gets the configuration of a Pod from the API server and ensures that the described containers are up and running.
Pods
Is a group of one or more containers with shared storage/network, and a specification for how to run the containers. Pods run on nodes and run together as a logical unit. It shares the Same Shared content and same IP but reaches other Pods via LocalHost. Single Pod can run on Multiple Machines and Single Machine can run Multiple Pods.
Kube-Proxy
Kube-proxy runs on each node to deal with individual host subnetting and ensure that the services are available to external parties. Kube-proxy acts as a network proxy and a load balancer for a service on a single worker node. It is the network proxy that runs on each worker node and listens to the API server for each Service endpoint creation/deletion.
Setting Kubernetes with MiniKube
Minikube is used to run Kubernetes locally. The MiniKube runs a single-node Kubernetes cluster inside the Linux VMs. Since it’s a single node cluster, we will not use it in production servers.
To install MiniKube on an Ubuntu machine, first, check your target platform and download the binary image. Minikube is a perfect tool for the development environment however it’s not the recommended service for the production server, we will need to use KOPS services from AWS.
Furthermore, we are using a Docker container to run the MiniKube.
Head over to the link for the official documentation on MiniKube. Here are the system requirements to host Minkube.
- 2 CPUs or more
- 2GB of free memory
- 20GB of free disk space
- Internet connection
- Container or virtual machine manager
curl -LO https://storage.googleapis.com/minikube/releases/latest/minikube-linux-amd64

sudo install minikube-linux-amd64 /usr/local/bin/minikube
Minikube doesn’t run with root permission, thus we need to configure our Docker to run in user mode, let’s create one group named docker.
sudo usermod -aG docker $USER && newgrp docker
Now, you can start the MiniKube container.
minikube start –driver docker
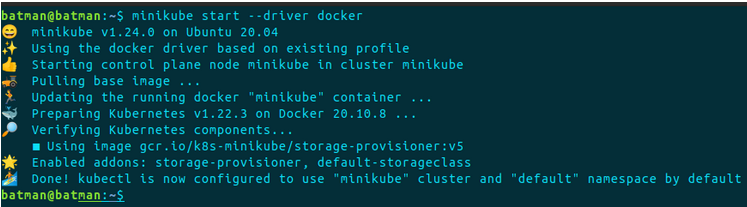
To check the configured services:
minikube status
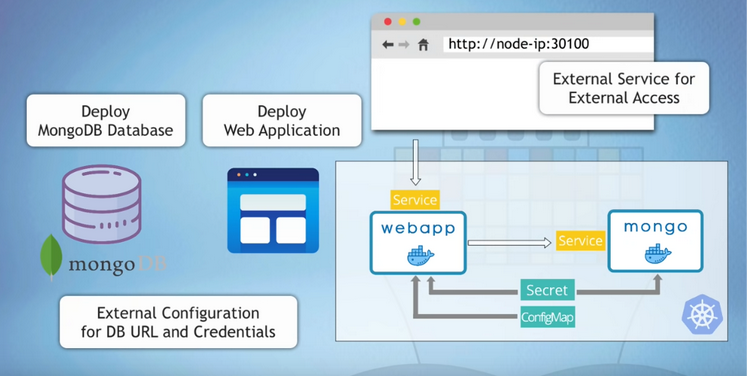
Kubernetes Demo Project
The structure of the demo projects looks like, we have MongoDB and the web application attached to the database. Finally, we will deploy and test the application externally from the web browser.
Things needed to get started:
- Kubernetes documentation to help us write files
- Docker repository where the application is hosted.
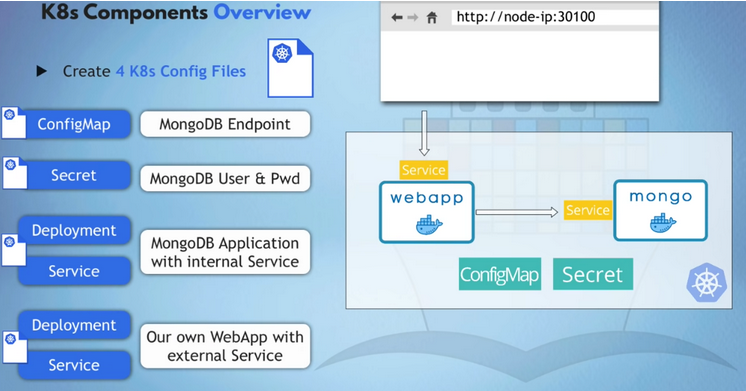
The K8s components include the following 4 files:
- configMap
- Secret file
- Deployment service file for MongoDB
- Deployment service file for WebApp
Kubernetes File Configuration
For the file configuration, we can use the Kubernetes official documentation and there search for the required files and services: https://kubernetes.io/docs
File1: mongo-config.yml
apiVersion: v1
kind: ConfigMap
metadata:
 name: mongo-config
data:
 mongo-url: mongo-service
File2: mongo-secret.yml
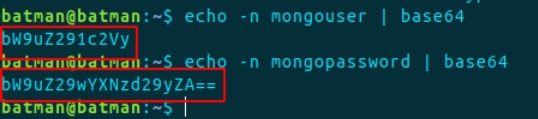
On the mongo-secret file, you can see the mongo-user and mongo-password sort of encoding. While using the mongo credentials in YAML, we cannot pass the plain text, we need to encode it with base64.
echo -n mongouser | base64
echo -n mongopassword | base64
Now we can use these parameters anywhere in deployment and service files.
apiVersion: v1
kind: Secret
metadata:
  name: mongo-secret
type: Opaque
data:
  mongo-user: bW9uZ291c2Vy
  mongo-password: bW9uZ29wYXNzd29yZA==
File3: Mongo.yaml
This file contains the deployment and the service codes.
Here, we are referencing the mongo image of version 5.0 from https://hub.docker.com/_/mongo
Also, the port, MongoDB runs at the port, thus we need to configure accordingly. Also, the pods mean the number of replicas we want in our deployment.
#deployment
apiVersion: apps/v1
kind: Deployment
metadata:
 name: mongo-deployment
 labels:
   app: mongo
spec:
 replicas: 1
 selector:
   matchLabels:
     app: mongo
 template:
   metadata:
     labels:
       app: mongo
   spec:
     containers:
     - name: mongodb
       image: mongo:5.0
       ports:
       - containerPort: 27017
       env:
       - name: MONGO_INITDB_ROOT_USERNAME
         valueFrom:
           secretKeyRef:
             name: mongo-secret
             key: mongo-user
       - name: MONGO_INITDB_ROOT_PASSWORD
         valueFrom:
           secretKeyRef:
             name: mongo-secret
             key: mongo-password

---
#service
apiVersion: v1
kind: Service
metadata:
 name: mongo-service
spec:
 selector:
   app: mongo
 ports:
   - protocol: TCP
     port: 27017
     targetPort: 27017
File 4: webapp.yaml
The web app YAML file contains the image from the docker hub, it’s basically the docker image we created out of our application. Our app is located at: https://hub.docker.com/r/nanajanashia/k8s-demo-app/tags
The container is of the node js application that starts at port: 3000 thus mentioning the port in our web app file.
#deployment
apiVersion: apps/v1
kind: Deployment
metadata:
 name: webapp-deployment
 labels:
   app: webapp
spec:
 replicas: 1
 selector:
   matchLabels:
     app: webapp
 template:
   metadata:
     labels:
       app: webapp
   spec:
     containers:
     - name: webapp
       image: nanajanashia/k8s-demo-app:v1.0
       ports:
       - containerPort: 3000
       env:
       - name: USER_NAME
         valueFrom:
           secretKeyRef:
             name: mongo-secret
             key: mongo-user
       - name: USER_PWD
         valueFrom:
           secretKeyRef:
             name: mongo-secret
             key: mongo-password
       - name: DB_URL
         valueFrom:
           configMapKeyRef:
             name: mongo-config
             key: mongo-url


---
#service
apiVersion: v1
kind: Service
metadata:
 name: webapp-service
spec:
 type: NodePort
 selector:
   app: webapp
 ports:
   - protocol: TCP
     port: 3000
     targetPort: 3000
     nodePort: 30001
Now we have all the setup of the required files to create a Kubernetes cluster.
Step 1: Make sure the MiniKube cluster is running.
minikube start
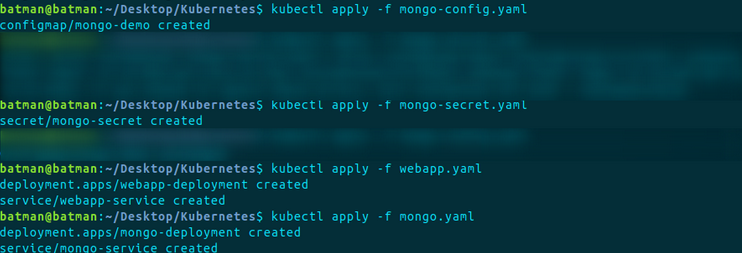
Step 2: First we need to create an external configuration with file mongo-config since all other deployment and services files depend upon these. Further, run other commands as follows:
Installing Kubectl:
curl -LO https://storage.googleapis.com/kubernetes-release/release/$(curl -s https://storage.googleapis.com/kubernetes-release/release/stable.txt)/bin/OS_DISTRIBUTION/amd64/kubectl

chmod +x ./kubectl

sudo mv ./kubectl /usr/local/bin/kubectl
Test to ensure the version you installed is up-to-date:
kubectl cluster-info
kubectl version
kubectl apply -f mongo-config.yaml
kubectl apply -f mongo-secret.yaml
kubectl apply -f webapp.yaml
kubectl apply -f mongo.yaml
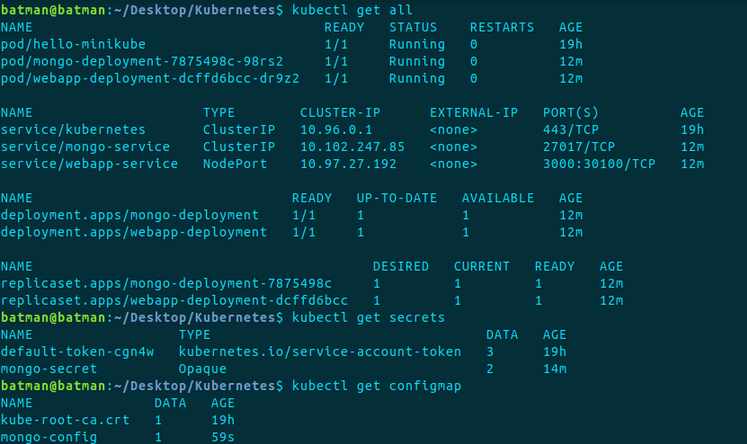
We can verify the running services with the following commands:
Kubectl get all
Kubectl get secret
Kubectl get configmap
During the process, if you get into any error, you can simply get the logs with the command.
kubectl logs <Pod_name>
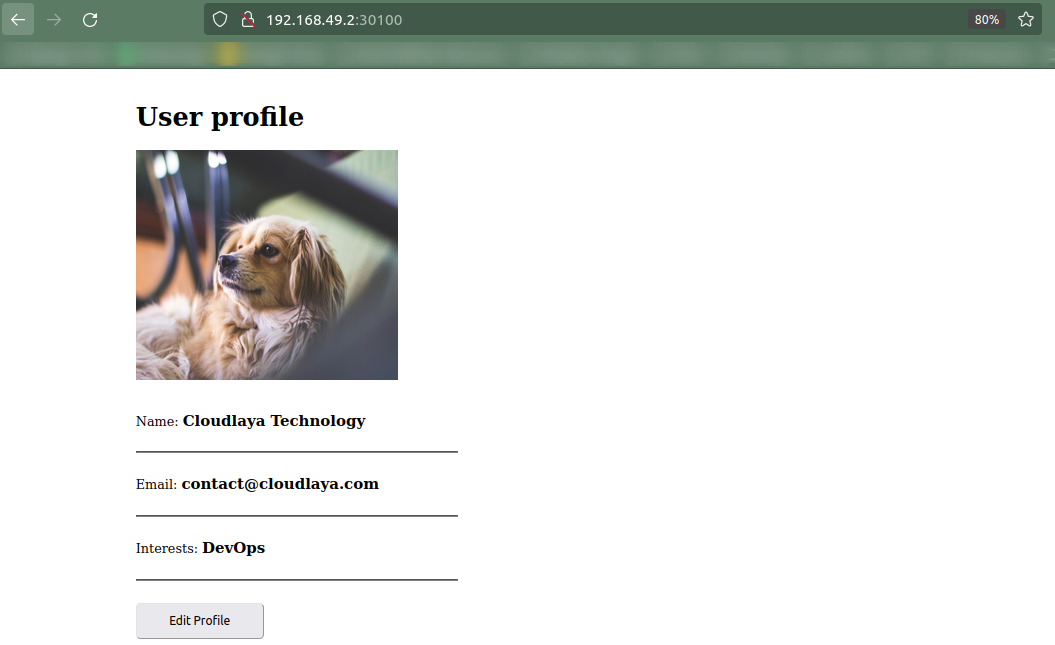
As the final step, we need to make sure our application is working on the webserver.

The application is available on IP address and Port: 192.168.49.2:30100
Kubernetes is an aspiring tool used in CI/CD pipeline. It provides a mechanism for the deployment, maintenance, and scalability of an application. On the other hand, Cloudlaya has been providing a continuous stream of value for multiple enterprises while practicing the best DevOps architecture. We start with understanding your company’s cloud needs. Then, we suggest ideal cloud solutions and products that seamlessly work together. Rest assured, with us, you will get high returns on your technology investment.

As a seasoned DevSecOps Consultant, I specialize in ensuring the reliability, scalability, and security of cloud infrastructure and applications that are crucial for my clients’ success.