How to Setup Zimbra Mail Server on CentOS 8 / RHEL 8
The mail server is one of the most important servers for any firm as all communication is done through emails. In the IT sector, there are several free and business mail servers. Zimbra is a popular mail server that is available in both open source and business editions. We’ll go through how to install and setup Zimbra Mail Server on CentOS 8 / RHEL 8 server in this post.
Table of Contents
System Requirements for Zimbra Mail Server
- A domain name
- CentOS VPS server (version 8)
VPS minimum requirements:
- CPU- 2Ghz
- Memory- 8GB
- Storage- 10GB
Prerequisites in Domain name
In your domain name, you need to initially create a couple of DNS records.
| Type | Host | Value |
| A | <Public IP> | |
| MX | @ | mail.cloudlaya.com |
Setting up Server
In order to set the VPS server, we can either use a Putty SSH client or if you are working on Linux OS, simply SSH the server.
sudo ssh centos@<PublicIP> -i <.pem directory>
After we are connected to the server, we can now work on the server setup. The first command is to access the root user. The update command updates the server to the latest version. Also, the nano is the text editor we will be required to edit system files later.
sudo -i
yum update -y
yum install nano -y
Disable SElinux
SElinux is the default security feature in RHEL 8. By default the system is enabled, we need to disable the security feature as it might interfere with setup Zimbra Mail Server on CentOS 8. Later, we will install Firewalld service which will secure our system.
To do that open the /etc/selinux/config file with nano editor.
nano /etc/selinux/config
Now, on the SELINUX section, edit the value to disabled.
# This file controls the state of SELinux on the system.
# SELINUX= can take one of these three values:
# enforcing - SELinux security policy is enforced.
# permissive - SELinux prints warnings instead of enforcing.
# disabled - No SELinux policy is loaded.
SELINUX=disabled
# SELINUXTYPE= can take one of these two values:
# targeted - Targeted processes are protected,
# minimum - Modification of targeted policy. Only selected processes are protected.
# mls - Multi Level Security protection.
SELINUXTYPE=targeted
Setting up the Hostname
Before installing the Zimbra server, we need to set up the hostname. If your domain is cloudlaya.com then the hostname will be mail.cloudlaya.com.
hostnamectl set-hostname mail.cloudlaya.com
Setting up Hosts file
To get the Zimbra server working, it’s necessary to set up the host file in our VPS server. To do so, edit the following file as the contents below the command.
nano /etc/hosts
127.0.0.1 localhost localhost.localdomain localhost4 localhost4.localdomain4
<PrivateIP> mail.cloudlaya.com mail
Note: Most of the failed configuration while setup Zimbra Mail Server on CentOS 8 is due to the improper host and DNS setup, thus be very careful when you are editing these files. Also, make sure you have your VPC server private IP pointing in the hosts file.
Setting up Network Card
Upon setting the network card, your system should have a public card already enabled. Here, we need to change the DNS of the network card according to our needs. Make sure, the DNS1 is always the IP of our server.
cd /etc/sysconfig/network-scripts
ls
nano ifcfg-eth0
You should see the following set of lines in the nano editor. Edit the DNS1 to the server IP, and set gateway and other DNS per required.
HWADDR=00:51:56:a3:e3:d9
NAME=ens192
GATEWAY=192.168.10.1
DNS1=<PublicIP>
DNS2=8.8.8.8
DNS3=8.8.4.4
DEVICE=ens192
ONBOOT=yes
USERCTL=no
BOOTPROTO=static
NETMASK=255.255.255.0
IPADDR=192.168.10.10
PEERDNS=no
Now, change the directory to root.
cd ~
Once we are in the root directory, restart the network-manager service.
systemctl restart NetworkManager.service
Modifying resolv.conf
Once the network manager is restarted, we need to check if the resolv.conf is properly set.
nano /etc/resolv.conf
The contents on the configuration file look like
# Generated by NetworkManager
search cloudlaya.com
nameserver <PublicIP>
nameserver 8.8.8.8
nameserver 8.8.4.4
Setting up DNS
Before installing Zimbra on our server, we need to install the DNS which acts as the Mail Transfer Agent (MTA) for our Zimbra server.
Run the following command to install the DNS package.
yum install bind bind-utils -y
Configuring named.conf file
To set the zone and the forwarders, now we need to configure the named.conf file.
nano /etc/named.conf
Now, add the following changes in the configuration file.
- Replace
- Listen-on port 53: <Public_IP> to your IP address.
- Replace
-
- allow-query: <Public_IP> to your IP address.
- Add
-
- forwarders { 8.8.8.8; }; before }; logging
- Add the following before the ‘include’ last lines of code
zone "cloudlaya.com" {
type master;
    file "cloudlaya.com.zone";
};
options {
    listen-on port 53 { 127.0.0.1; <Public_IP>;};
    listen-on-v6 port 53 { ::1; };
    directory     "/var/named";
    dump-file     "/var/named/data/cache_dump.db";
    statistics-file "/var/named/data/named_stats.txt";
    memstatistics-file "/var/named/data/named_mem_stats.txt";
    recursing-file  "/var/named/data/named.recursing";
    secroots-file   "/var/named/data/named.secroots";
    allow-query     { localhost; <Public_IP>; };

    recursion yes;

    dnssec-enable yes;
    dnssec-validation yes;

    /* Path to ISC DLV key */
    bindkeys-file "/etc/named.iscdlv.key";

    managed-keys-directory "/var/named/dynamic";

    pid-file "/run/named/named.pid";
    session-keyfile "/run/named/session.key";

    forwarders { 8.8.8.8; };
};

logging {
        channel default_debug {
                file "data/named.run";
                severity dynamic;
        };
};

zone "." IN {
    type hint;
    file "named.ca";
};

zone "cloudlaya.com" {
    type master;
    file "cloudlaya.com.zone";
};

include "/etc/named.rfc1912.zones";
include "/etc/named.root.key";
Create Domain zone file
Since we have already set the domain and the file in the named.conf file, now we need to actually create these files in the named directory.
nano /var/named/cloudlaya.com.zone
Before adding our domain and server IP in the file zone, we need to make sure the MX and A record is properly set in our domain name.
dig -t A cloudlaya.com
dig -t MX cloudlaya.com
The command should display a proper result in the ;; ANSWER SECTION:
If you run the following command with +short postfix, you should get only the answer section.
dig +t A cloudlaya.com +short
Now, add following contents in your zone file
;
; BIND data file for local loopback interface
;
$TTL 86400
@ IN SOA ns1.cloudlaya.com. root.cloudlaya.com. (
2021104 ; Serial
604800 ; Refresh
86400 ; Retry
2419200 ; Expire
604800 ) ; Negative Cache TTL
;
; name servers - NS records
@ IN NS ns1.cloudlaya.com.
@ MX 10 mail.cloudlaya.com.
; name servers - A records
ns1 IN A <Public_IP>
mail IN A <Public_IP>
Starting the DNS Service
Since we have DNS all set up, we can now start the service.
systemctl enable named && systemctl start named
Installing Zimbra Server
First and foremost we need to stop the postfix service that is running in our system. Running the local postfix will overload and switch the Zimbra server to stress mode preventing the sending of email.
systemctl stop postfix && systemctl disable postfix
Now, run the following command to install Zimbra dependencies.
yum install unzip net-tools sysstat openssh-clients perl-core libaio nmap-ncat libstdc++ wget -y
Download and install the Zimbra package
On the root folder, create a new file and install Zimbra into it.
mkdir zimbra && cd zimbra
You can download the latest Zimbra images from the official open-source image archive. However, installing the following file works fine as it’s tested by our team.
wget https://files.zimbra.com/downloads/8.8.15_GA/zcs-8.8.15_GA_3953.RHEL8_64.20200629025823.tgz
Now, install tar package to unzip the Zimbra zip file.
yum install tar -y
tar zxpvf zcs-8.8.15_GA_3953.RHEL8_64.20200629025823.tgz
After extraction, move to the zimbra directory and run the install.sh bash script.
cd zcs-8.8.15_GA_3953.RHEL8_64.20200629025823
Locate the available files.
ls
Here, you should see the install.sh file, now fire the command.
./install.sh

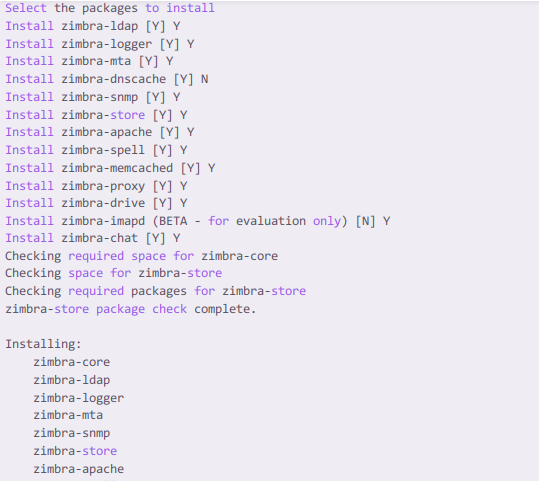
Now zimbra asks you to agree to certain license agreements, type Y and return.
After that, you are asked to confirm the installation of Zimbra services. Type Y to install and N to discard.
Since we have already set the DNS for our server, in the Install Zimbra-DNS section, we should type N.
Also, the Zimbra-Imapd is in beta version, we can discard the installation with N as shown in the image below.
After the installation completes, Zimbra throws an DNS error, which is obvious because initially we were pointing our DNS to mail.cloudlaya.com but we have our MX record at cloudlaya.com. Type ‘Yes’ and enter cloudlaya.com.
Note: If you have your MX record set in mail.cloudlaya.com then you can ignore the DNS error and press return key.

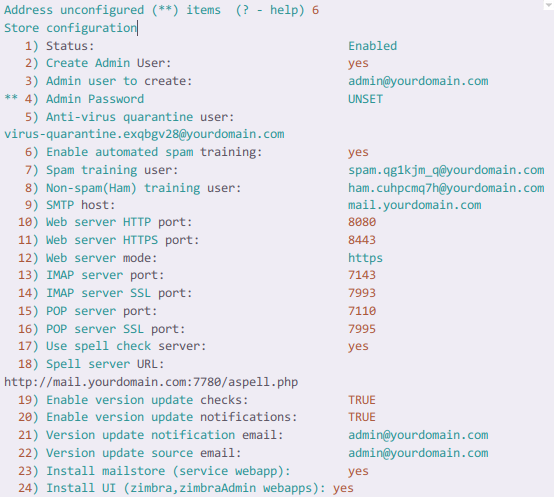
On the main menu, we get to see the following configurations. Here we are interested in setting a new password for our Zimbra Admin. Here, type number 6 and return.
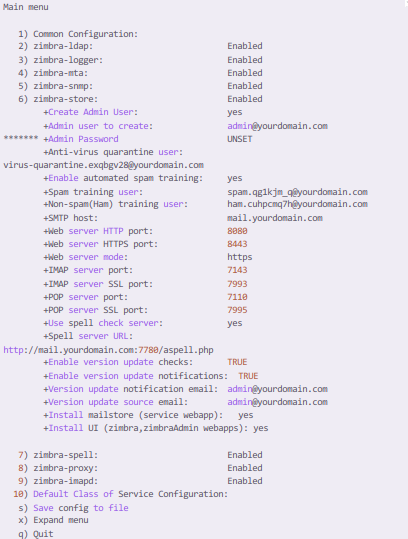
After this, on the next screen, enter the number 4 and return. Here, Zimbra will provide you an auto generated password, or you can manually type the custom password. Save the default username and the password somewhere safe. We will need these credentials to login to the Zimbra admin panel.
Next, follow the instructions and press r to move to the previous menu.
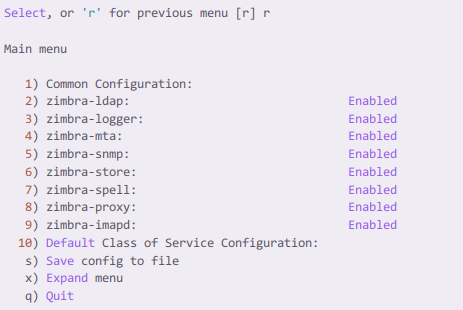
Finally, after the configuration completes, press a as shown in the instruction to apply and save changes.
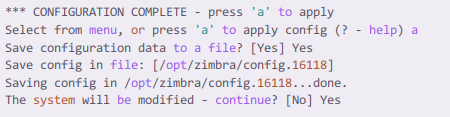
The configuration can take about 3-5 minutes depending upon the network.
As the installation finishes, the Zimbra server auto creates a new user named Zimbra. You can switch to the zimbra user from the root user with the following command.
su zimbra
Checking services and Security
To check the available services and their status run the following command.
zmcontrol status
You should see the following results where services are in running state.
Remember the part where we disabled the SElinux. Now, for the sake of the Zimbra server to run properly, we will set a firewall.
CentOS comes with firewalld services pre installed, incase you don’t have the service, you can install the firewalld with following command.
sudo yum install firewalld
To enable the firewalld service, run the following command.
sudo systemctl enable firewalld

sudo systemctl start firewalld
Since the firewalld service is running, now we can set protection against following TCP ports.
firewall-cmd --permanent --add-port={25,80,110,143,443,465,587,993,995,5222,5223,9071,7071}/tcp
Next, reload the firewall after the ports are set.
firewall-cmd --reload
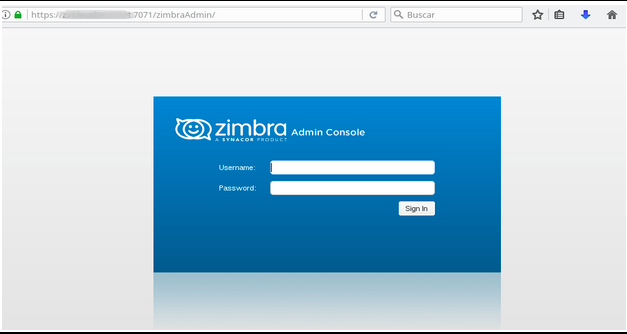
Accessing Zimbra Admin panel
Now, we are all set to access the Zimbra Admin panel.
Note: The admin panel is accessible with the port 7071. Thus use this url in the browser.
https://mail.cloudlaya.com:7071/ZimbraAdmin
Login to the admin console with the Username and Password you have previously saved.
Usually the username pattern is: [email protected]
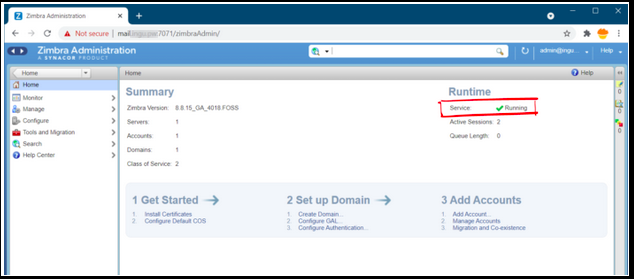
After that, you should see the following dashboard. Keep eyes on the Runtime section in the dashboard, it should be in the running state. If not, restart the Zimbra server.
Post Zimbra Configuration to setup Zimbra Mail Server on CentOS 8
If you have followed along with the tutorial, you should have the Zimbra server up and running however we still have a task left to perform post configuration.
Switch back to the Zimbra user.
If you have followed along with the tutorial, you should have the Zimbra server up and running however we still have a task left to perform post configuration.
Switch back to the Zimbra user.
sudo -u zimbra -i
Next, we need to update the SSH keys. To do so, fire the following command. Zimbra fetches and updates the SSH keys on it’s own.
sudo -u zimbra -i
Now, exit out of the Zimbra user and switch back to the root user.
exit
Setting up the Zimbra system log helps us to track the issues in the long run, thus it’s advised to set up and update the systemlog.
/opt/zimbra/libexec/zmsyslogsetup
Again, security in email servers is one of the critical parts. We can use the Calm AntiVirus which is an open-source AntiVirus available on cross platform.
Run the following command to scan
zmprov mcf zimbraAttachmentsScanURL clam://localhost:3310/
zmprov mcf zimbraAttachmentsScanEnabled TRUE
DKIM, DMARC, SPF Record Setup
Previously we have set up A and MX records in our domain name. Now, it’s a good time to set up DKIM, DMARC and SPF records. Followingly we will also look into creating reverse DNS for Zimbra.
Generating DKIM key on Zimbra
Login back to the Zimbra user using the following command
su zimbra
Now, generate the DKIM key
/opt/zimbra/libexec/zmdkimkeyutil -a -d cloudlaya.com
You should get the following output from the above command.
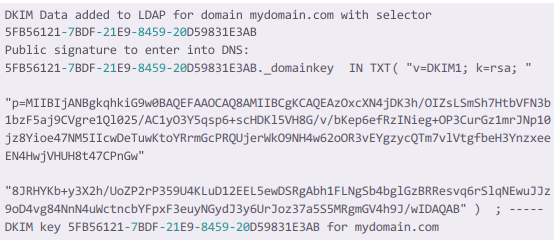
| Type | Host | Value |
| TXT | 5FB56121….. | p=MIIBIjANBgkqhkiG9w0BAQ………. |
Incase of error, you can update, delete and create a new DKIM key with zmdkimkeyutil.
Generating DMARC Record for Zimbra
You can create a DMARC record for your website using MXToolbox.
| Type | Host | Value |
| TXT | _dmarc | v=DMARC1; p=quarantine; …. |
Generating SPF Record for Zimbra
We can use MXToolbox again to generate SPF records for Zimbra.
| Type | Host | Value |
| TXT | @ | v=spf1 a mx a:mail.cloudlaya.com ip4:192.168.10.10 ~all |
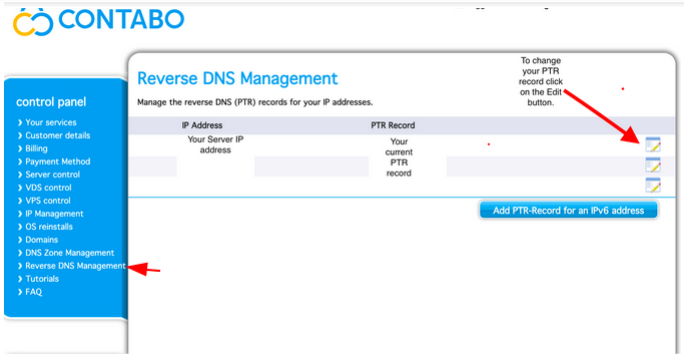
Creating a Reverse DNS
Finally, we set rDNS for Zimbra. Insert your IP address and mail.cloudlaya.com in the PTR record.
Conclusion
We have finally completed to setup Zimbra Mail Server on CentOS 8 from scratch. Zimbra is an open-source mail server that provides substantial services like mail, calendar, chat, storage, and so on.
As you see the Zimbra setup is comparatively complex, you can contact Cloudlaya today to set up the server as per your organization’s need.